


This fall StoneGable's front door got a new color and face lift. To see the original post and more wreath photos, click HERE.

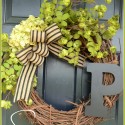
This disheveled unkempt wreath captures the colors and texture of late fall. It is big and fluffy and fills up the door so nicely!

The wreath is easy to make, a little messy and very fun! It has that WOW factor I love while being very economical (under $15.00)!
Hope you will give it a try!

STONEGABLE'S RAFFIA WREATH
1 large bag of natural raffia
60 U pins (about 3 boxes)
1 straw wreath wrapped in plastic
scissors
hot glue gun
Put straw wreath on a work surface. Do not take the plastic wrap off of the wreath.

Pull out several stands of raffia from the bag and gather it like the picture below pinching in the middle. You may have to adjust the size of your gathered raffia as you go along. It is not rocket science! So if you are not happy with the raffia just redo it!

Slide the U Pin over the pinched center of the raffia. Add a little hot glue to each prong of the U Pin. Center on wreath. Pin one raffia cluster with the pin horizontally to the wreath.
Push the U Pin in the wreath with the handle of your scissors and hold just a minute until the U Pin is well secured.

Cut the loops of the raffia. Don't worry that the raffia is not all the same length. You actually don't want it to be all the same. Messy is good!

Continue the procedure above, but pin the U Pin vertically into the wreath this time. Cut loop ends.

Continue all around the wreath, alternating pinning the raffia horizontally then vertically.

When your wreath is completed, give it a haircut here and there as needed. Also pull out some strands of raffia so they are longer and straggly than others . Fluff and fuss with the raffia until you are happy with the wreath.
I added bleached oak leaves using a wired pick.
Hang on a door.

You will get lots of compliments!

Don't Forget To...


.jpg)


Yvonne:
ReplyDeleteThe wreath is so beautiful! Will have to try it....Doesn't seem to hard to make....Have a wonderful day!
Thanks for sharing!
It looks beautiful on your door!
Hello,
ReplyDeleteWhat a fabulous wreath! Love the rustic and yet simple look of it.
Gabriela
Well....its off to HL to gather supplies to make this wreath. Its a fantastic look on your front door Yvonne. Your tutorial and list of supplies is something anyone can handle. Thanks so much for sharing.
ReplyDeleteWhat a beautiful fall wreath. It looks perfect on your "new" door! I love the fact that it is so easy! Great tutorial!
ReplyDeleteI love this! Thanks so much for the easy-to-follow tutorial..I will definitely try it out!
ReplyDelete-Abigail
I bet you get lots of compliments - here's another one - it is beautiful, love it. It does sound fun and messy to make. Thanks for sharing.
ReplyDeleteFabulous wreath!, thanks for the great tutorial.
ReplyDeletePerfectly Autumnal, thanks for the great tutorial!
ReplyDeleteGreat wreath, love it!
ReplyDeleteOh Yvonne, does your talent know no end?!
ReplyDeleteI absolutely love this wreath ~ thank you so much for the excellent tutorial. I hope you're having a wonderful day!
So beautiful and creative! I am going to attempt a felt wreath for Christmas - maybe with an owl on it! Or a fox .... or bells!
ReplyDeleteI'm having a giveaway my blog - trying to give back to my lovely readers!
Your wreath is beautiful. I'm not familiar with bleached oak leaves. Can you purchase them as is, or do you bleach them yourself?
ReplyDeleteI'm always happy to see your latest posts. They're such an inspiration.
Thanks for sharing so much on your blog. IT's appreciated.
Yvonne, This is such a great wreath. I just bought a straw wreath and was ready to make another wreath, but now think I will give this a try.
ReplyDeleteThanks for the Tutorial.
Beautiful "almost" black door and wreath. After trying to convince her for years, my mom finally gave in and let me paint her front door black last year...and it made such a statement...kind of like the proverbial "little black dress" that is classic and looks great dressed up or down with accessories. Your rustic wreath looks amazing here and I can imagine that we will see many more of your beautiful handmade creations changing the mood up as time goes on. I don't blame you a bit for not wanting to give up that brass plaque...it's the perfect piece of "jewelery" for your door!
ReplyDeleteJermaine
Love, love, love the fluffy raffia wreath!!!! it adds such great texture to your door!!!
ReplyDeleteBeautiful Yvonne, Great post and idea! Hugs Marilou
ReplyDeleteLOVE IT!
ReplyDeleteLOVE IT!
LOVE IT!
Yvonne,
Thank you, so very much!
~Lynne
[w/L]
I love it...I always have to do one more thing for Thanksgiving...and you provided the idea...thanx...definitely unique...
ReplyDeleteDonna
Tinglelaneprimitives.blogspot.com
Thanks so much for the tutorial; now I have to go get some supplies and try my own.
ReplyDeleteHugs,
Pam
So pretty Yvonne. Thanks for the tips.
ReplyDeleteSam
Well, isn't this adorable, and EASY!! Love it! XO, Pinky
ReplyDeleteSo pretty!! Love it.....great fall idea!
ReplyDeleteThe wreath looks great Yvonne! Fun and welcoming:@)
ReplyDeleteI love this idea! And I have a TON of raffia on hand too!
ReplyDeleteThat is a fabulous wreath, Yvonne!
ReplyDeleteYour tutorial was fun to read too!
Wishing you the very best of autumn and a lovely week in preparation for Thanksgiving!
Can you believe it's just a week away!?
~Maria
Yvonne, thanks for the tutorial. Knowing me, I'll never get one of these done, but I sure do like the look. Who knows, perhaps I'll surprise myself. LOL
ReplyDeleteAlways a treat to visit Stone Gable! ~ Sarah
WOW...love your wreath! What a great way to decorate the entry way and the leaves make it perfect! Thanks so much for the "how to!"
ReplyDeleteThis is what I've been waiting for. Can't wait to try it out - oh, and I already have a straw wreath to start with (now if I can just find it.)
ReplyDeleteThank you for the instructions.
I love the wreath. Great tutorial, you make it look so easy I may give it a try. Its beautiful on your door.
ReplyDeleteHappy Thanksgiving.......
~Emily
The French Hutch
Hi, Yvonne!
ReplyDeleteI love your wreath and am going to try to make one! Where did you get the "bleached oak leaves" which you added? Is that something you purchased, or did you somehow make them yourself from nature's bounty? I have an elm leaf soaking in bleach, but it is not lightening it at all.
Pat
PersonallyByPat.com
For Pat,
ReplyDeleteYou are a clever one to soak the leaves in bleach. I bought my at a local shop Stauffer's of Kissel Hill in Lancaster Pa.
Try to google how to bleach leaves!
Good luck!
Yvonne
I really like this a lot! This is a must do!
ReplyDeleteI'm going to try that! Great idea,
ReplyDeleteDeb@LakeGirlPaints
How beautiful and what a great idea. I have a store asking me to make some things for them and this looks like a quickie and easy project.
ReplyDeleteJust wanted to say that I noticed a few words missing in your post. I noticed last night that a few of my pictures from past posts had disappeared. Do you know if something is going on with blogger?
Cindy
Wowzers. This is stunning. I saw the link on your sidebar but could not for the life of me figure out how you made it and then I see the tutorial and boy oh boy. It's simple! Thanks for sharing this!
ReplyDeleteA very very beautiful idea!
ReplyDeleteDébora from Italy
Beautiful! Great tutorial! Will definitely have to try this one out :)
ReplyDeleteHope it's okay to pin because I can't do it this year but it's on my list for next year. It's exquisite!!! xo
ReplyDeleteThis site is the best I have seen. Love the way you show us how to make the items. Thanks
ReplyDeleteCan you provide details on how to do the bleached oak leaves?
ReplyDeleteI am looking to make this in possible a dusty rose raffia color. I am having trouble finding large bags of raffia.I am finding the small 8oz packages. How do I know how many ounces I need to make this.
ReplyDeleteThank you so much for this tutorial! I was able to make two wreaths for my front door!! They turned out amazing! http://thesenguptabunch.blogspot.com/2013/10/33-weeks.html
ReplyDeleteThis is stunning, Yvonne! I usually shy away from raffia because it can be a bit of a pain. Your wreath is gorgeous though. I love how it has so much texture, captures Fall, but doesn't require the traditional colors. Love!
ReplyDelete