skip to main |
skip to sidebar


Entryways can become landing spots for clutter! Not at Jenn's at CLEAN AND SCENTSIBLE! She has an ORGANIZED FRONT ENTRY that is welcoming and clutter free!


Before we begin... I want to remind you that TUTORIAL TIPS AND TIDBITS goes live at 8:00 tonight. Share your DYI'S, tips and any tidbit you want to show us and show off! See you then!
What's a girl to do when she wants a pair of euro shams to match the curtains she just made?


INSPIRATIONAL FRIDAYS At The Picket Fence

Look For These Posts Soon!
CATCH UP ON POPULAR POSTS
Showing posts with label SEWING. Show all posts
Showing posts with label SEWING. Show all posts
HOW TO MAKE A PILLOW FROM A PLACEMAT
Saturday, September 21, 2013
Labels:
fall,
Fall projects,
Pillows,
SEWING
Recently, while shopping, I came across a fabulous fall placemat and thought, "If only this were a pillow, I'd buy it". Then the creative light bulb went off. Why not make this great placemat into a pillow!
It only took 30 minutes using a little fairy godmother magic... to turn this pumpkin into a pillow!
BIBBITY BOBBITY BOO... I'll show you how...
SPRING PILLOW LOVE
Saturday, March 23, 2013
Labels:
Pillow Love,
SEWING,
spring
I have such a crush on pillows! And an even bigger obsession with making them myself. Give me a remnant and a little funky trim and I'll use it to make a pillow!
Even though my living room has two pieces of furniture in it right now, (until the bulk of it is delivered in mid April) I still wanted my sofa to be welcoming and pretty...
I was at the Calico Corner's Outlet recently (hi, girls!) and picked up a few on-sale remnants for pillow making.
I could not pass up this great cotton buffalo check... and look at the ca-ra-zy trim I found for it!!!
So fun and sassy! I'll be able to use this for any season.
This sweet Le Lapin pillow has been on my must-try list for awhile now! I first saw it at CONFESSION OF A PLATE ADDICT. Debbie did a masterful tutorial complete with a printable transfer!
She was so nice to share with all of us!
I like her knock-off so much better than the original Ballard Design pillow!
I tweaked her directions just a little to make it my own. I changed the stripe design just a tad.
I also made an envelope back closer because I wash my pillow cases and reuse my feather pillow inserts.
For a great an easy to follow tutorial for Le Lapin, click HERE.
TUTORIALS TIPS AND TIDBITS # 15
Wednesday, September 26, 2012
Labels:
Crafting,
DYI,
fall,
Painting,
SEWING,
TUTORIALS TIPS AND TIDBITS
Welcome to...
TUTORIALS TIPS AND TIDBITS #15
Wow 15 already! A big thanks to everyone who comes and shares and has made TTT a great creative place to visit! I am overwhelmed by all the talent and great project, tips and tidbits shared each week. I could go on and on... but really you just have to see all these great projects yourself!
Here are just a few examples...
Look at this fabulous TIERED TRAY!!!! Wouldn't you love to have this to decorate? It was the the most viewed post last week!
Karen from SHABBY SWEET COTTAGE made this beauty from a Goodwill find! Way to go, Karen!

This PAINTED INITIAL BURLAP PILLOW is perfect for fall! It looks so cozy and welcoming with a tartan blanket! Andrea at OPPULENT COTTAGE gave us an easy to follow tutorial for making this comfy personalized pillow!
Sophia, your FALL TABLE CENTERPIECE is stunning! She shares tips and lots of great photos to inspire us! Run on over to LIVE BEAUTIFULLY... ON A BUDGET (after your visit here) and see her beautiful dining room and her new fall planter centerpiece!

Are you hungry? Well, you will be if you read about CHICKEN PARMESAN MEATLOAF from Alyssa at WHAT'S COOKING LOVE?
Ground chicken can tend to be a little dry... but look at the moist cheesy topping on this! I bet it is delicious!
This is going ON THE MENU!

Angie at ECHOS OF LAUGHTER shared 5 EASY DECORATING TIPS. So full of creativity... and inexpensive!!! My kind of decorating!

What a great idea! Making your own blanket! Mary from AT HOME ON THE BAY shared here
If you can sew a straight line and measure this is a project that you can do! Making your own blanket opens up such great fabric options!

Jen from CITY FARMHOUSE shared a wonderfully detailed tutorial on PRINTING ON LINEN and also included FREE FALL PRINTABLES. These are more than adorable!

Here are a few tips from me about KITCHEN CANISTERS...

If you have been featured at TUTORIALS TIPS AND TIDBITS please grab a "Featured" button from my sidebar.
Now let's see what great TUTORIALS, TIPS AND TIDBITS you have for us!
* Please link your post using your permalink
* Please link back to TUTORIALS TIPS AND TIDBITS in the body of your post. You can find my button TTT button on my sidebar.
* Visit other TTT participants... let's all visit at least 3 others and comment
* Please link up only photographs that belong to you.
* It would be nice if you would follow me, thanks!
TUTORIAL TIPS AND TIDBITS #9
Wednesday, August 15, 2012
Labels:
DYI,
Organizing,
Painting,
Recipes,
SEWING,
TUTORIALS TIPS AND TIDBITS
Welcome to TUTORIAL TIPS AND TIDBITS! All of you have been very busy! You have been painting and rearranging and baking and updating and planting and gluing and sewing and stacking and getting ready for fall! There is so much creativity going on in blogland!
Here are just a couple featured blogs from last week's TTT ...
Here are just a couple featured blogs from last week's TTT ...
Last week's most viewed post was this beautiful WEATHERED CARRIER from Karen at SHABBY SWEET COTTAGE. What a gorgeous photograph too!

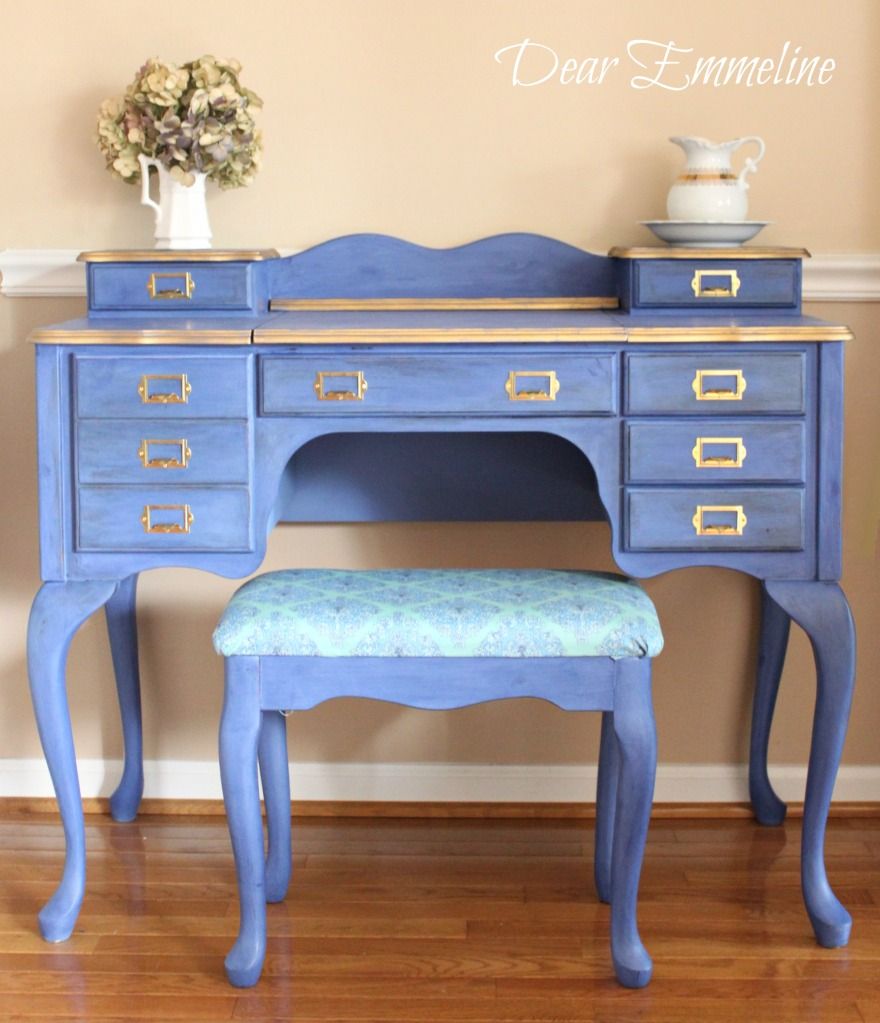
A $15.00 desk was turned into this stunning CARD CATALOG VANITY at DEAR EMMERLINE. Isn't that color striking... and look at the drawer pulls!!!!

Most of us have an old tray lying around... and Barbara from 21 ROSEMARY LANE transformed her's into this chic WINE CORK SERVING TRAY. I am saving my wine corks!

Here is a great idea to use up all the herbs growing like weeds in the garden! BUSY MOM'S MENU PLAN has a TRIO OF HERBED BUTTER that looks delicious. The great thing about herb butter is that it is so freezer friendly.... and can be added to so many dishes!

Look at this unique and swoon worthy bridal bouquet from ELIZABETH & CO.! These BROOCH BOUQUETS are becoming increasingly popular... they are so individual and magnificent!!! Make sure you check out the adorable couple and some other great wedding tips!

Many of you know that I LOVE LOVE LOVE tablescapes! Sarah at HYACINTHS FOR THE SOUL shows us how to set a SASSY TABLE using black and white with a pop of color!

Entryways can become landing spots for clutter! Not at Jenn's at CLEAN AND SCENTSIBLE! She has an ORGANIZED FRONT ENTRY that is welcoming and clutter free!

This week I am giving you the THE BEST PAINTING TIP YOU WILL EVER GET... REALLY! I recently went to an ASCP painting class and learned something that will effect every piece of furniture I paint... I am thrilled to share it with you!

If you have been featured at TUTORIALS TIPS AND TIDBITS please grab a "Featured" button from my sidebar.
Please visit our featured bloggers and see their creative blogs!
Now let's see what great TUTORIALS, TIPS AND TIDBITS you have for us!
* Please link your post using your permalink
* Please link back to TUTORIALS TIPS AND TIDBITS in the body of your post. You can find my button TTT button on my sidebar.
* Visit other TTT participants... let's all visit at least 3 others and comment
* Please link up only photographs that belong to you.
* It would be nice if you would follow me, thanks!
MAKING EURO SHAMS
Wednesday, August 1, 2012
Labels:
Euro Shams,
Gable Room,
SEWING
What's a girl to do when she wants a pair of euro shams to match the curtains she just made?
Make them herself... of course! And that is just what I did!
Making a patterned euro sham is just a little trickier than a solid one. BUT you can do it... I did! And believe me I am not a seasoned seamstress!
Here are a couple of things you will need to think about when making a patterned euro sham.
Each pair of pillow shams uses 2 ~ 30 x 30 inch pieces of fabric and 4 ~ 17 x 30 inch pieces of fabric.
You will need to buy more fabric than that because you will want the pattern of your fabric to be centered on your sham and you will want them to match.
You will also have to "match" the patterns on the back of the sham with the opening. There was quite a bit of fabric waste on my pillow shams as the repeat of the motif was 27 inches!
BUT, it is so worth it! I have a set of designer euro shams that match my curtains!
Let's get started...
Let's get started...
StoneGable Euro Sham Tutorial
This makes ONE 28 inch square Euro Sham. Double the instructions to make 2 euro shams.
Cut 1 piece of fabric 30 x 30. Make sure to center the design in the middle of the material.
Cut 1 piece of fabric 30 x 17 . If you are working with a pattern, make sure the pattern is where you want it on the pillow.
Fold over the 30 inch center edge 1/2 inch and 1/2 inch again and sew to secure.
Cut another piece of fabric 30 x 17 matching the pattern on the fabric to the other 30 x 17 inch piece.
Pin it to make sure it lines up properly. Just to double check, I pin the pillow top together with the pillow back panels before going any further.
If everything lines up perfectly, sew the inside seam of this 30 x 17 inch piece.
Fold over 1/2 inch and 1/2 inch again. Sew to secure.
Now it's time to sew your pillow together. Repin your pillow back center seams together matching the pattern, making sure your pillow back measures 30 x 30.
Lay the pinned pillow back RIGHT SIDE UP on a flat surface. Lay the pillow front WRONG SIDE UP on top of the pillow back. Pin together.
I am not a fan of what I call French Bulldog Corners (however I love real French Bulldogs!). Some homemade pillows have corners that spike up like the ears of a French Bulldog! They are a tale-tell sign of a novice seamstress. And they are so easy to fix!
With just a few measurements and a couple of drawn lines you can have professional tapered corners!
Here's how...
1 ~2. This is to be done on all corners... measure and mark 3 inches on each side of a corner
3~4 Measure and mark 1 inch one each side of a corner
5. Draw a live between the 3 inch mark on one side to the 1 inch mark of the other side.
6. Do the same with the remaining two marks.
Measure and mark all 4 corners.
7. This will be your sewing guide.
Using a 1/2 inch seam allowance, sew up the outside edges of the euro sham. When you get to the corners follow the lines you marked.
8. Cut off excess and clip corners.
Look at these pretty corners!!! Easy!
I just found out that you can also purchase a little template that will make tapered corners on your pillows. Just thought you should know!
Press seams and iron the pillow sham. With right sides out, sew a 1 inch seam around the outside of the euro sham. This will make the flange.
Iron the sham and stuff them with a Euro Pillow insert. I recommend POTTERY BARN PILLOW INSERTS. They are rather inexpensive and are wonderfully pouffy!
Here is a tiny glimpse at the Gable Room... The curtains and the pillow shams add a splash of subtle color and warmth to this antique feminine room.
Come back on Saturday and I will tell you about the Gable Room Bed!


OPEN HOUSE at No Minimalist Here
FEATHER YOUR NEST FRIDAY at French Country CottageINSPIRATIONAL FRIDAYS At The Picket Fence
Subscribe to:
Comments (Atom)
Upcoming Posts at StoneGable

Look For These Posts Soon!
Search This Blog
Followers
Subscribe for updates
Popular Posts
-
Do you make pro/con lists? I do, at least in my head. A pro/con list can really help pinpoint and direct me to the right dec...
-
I found these fabulous square chippy frames at Luckett's last week and knew they would go on the bare wall in the dining room! ...
-
Sunflower and fall are a perfect match! While many summer flowers are fading, those big moppy heads of bright yellow are at their pe...
-
I should be the National Spokeswoman for BALL JARS !!! It's true... I have such a big crush on them! It all started wh...
-
Many tables have been set on the northwest corner of the porch. In all those years I have never thought to make that space into an out...
-
D ear Readers, I must postpone StoneGable's 2nd Blogiversary Giveaway until next Tuesday, October 18th. I am so sorry! M y M...
-
The weather was in the triple digits, the humidity was just as high and our air conditioner broke. The flies were awful and ev...
-
Want a fun delicious dessert for your holiday weekend? These darling little fruit pies made in ball jars are real crowd pleas...
-
It's been one month and one day since my double knee cap surgery... and I can't say "time flies"! It's been quite ...
-
I received quite a few e-mails last week asking to identify the flowers in the planters from last Saturday's post. I prom...
Archive
-
►
2013
(353)
- December (31)
- November (30)
- October (29)
- September (29)
- August (26)
- July (30)
- June (32)
- May (31)
- April (29)
- March (29)
- February (28)
- January (29)
-
►
2012
(281)
- December (29)
- November (27)
- October (32)
- September (29)
- August (31)
- July (31)
- June (25)
- May (26)
- April (26)
- March (24)
- February (1)
-
►
2011
(219)
- December (3)
- November (25)
- October (20)
- September (20)
- August (25)
- July (23)
- June (25)
- May (19)
- April (17)
- March (22)
- February (4)
- January (16)


.jpg)


