
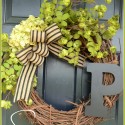


It's not too late to make a couple of plush posh velvet pumpkins for Thanksgiving!
They are so dramatic and exquisite. Rich in texture, these pumpkins are a stand-out!
If you don't make them this year save all your pumpkin stems and tuck this tutorial away until next fall.
Before making this tutorial I read so many others for Velvet pumpkins. I tried many techniques and materials until I came up with a tutorial that I feel worked the best.

STONEGABLE POSH PUMPKIN TUTORIAL
interesting pumpkin stems
velvet
colored pencils
doll needle (long needle)
thread
E6000 industrial glue
filler~ I used a poly bead fill
Collect pumpkin stems. They just snap off the pumpkins. I now look at a pumpkin for the stems and not necessarily for the pumpkin! Go to a store, produce stand etc. and ask them if you can pop off the stems before they throw any of their pumpkins away. Offer to make them a velvet pumpkin in return. I did and it was a great trade!

Cut circles out of the velvet. I bought 1/2 yard and made 7~ 8 inch circles and 3~ 11 inch circles and 1 larger circle. I used a salad plate, a dinner plate and a charger to make my circles.
Using a yellow colored pencil draw the circles on the WRONG side of the velvet. Some of my circles were so off! This is not rocket science... you could even eyeball it!
Thread a doll needle with thread that matches your velvet. A doll needle is a l-o-n-g needle and it is necessary to help you sew up the top of the pumpkin.
Make a running stitch 1/4 to 1/2 inch from the edge of the velvet all the way around the circle.

Gather the thread and pull the pumpkin top together. Leave enough room to fill.

I tried filling my pumpkin with multiple materials. Fiberfill~ too floppy and not realistic... beans~ too structured... rice~ okay, but hard to shape... poly filler beads~ perfect!!! The poly fiber beads gave the pumpkin great shape and filled up all the nooks and crannies in the pumpkin. It was also easy to "poof" the pumpkin.
I filled the pumpkin using a kitchen funnel.

Once the pumpkin is filled to your liking ( I like mine plump and firm) sew up the opening.


I used E-600 to glue in the stem of the pumpkin. I tried hot glue....NOPE! I was not impressed with the way it held.
Find the perfect position for the stem on the pumpkin BEFORE you glue it down.
Put a big dollop of E-6000 in the center of the sewn top. Rub the glue into the velvet with the stem of the pumpkin to make sure all the fibers are coated. Cover the end of the pumpkin stem with E-6000 and afix to the pumpkin. Hold for a minute or 2. Set aside and let completely dry.


Enjoy your pretty posh velvet pumpkins!


I am participating in..
Seasonal Sunday at The Tablescapers
Metamorphsis Monday at Between Naps On The Porch


.jpg)


How nice of you to share this wonderful project.
ReplyDeleteThanks for all that information. I have wanted to make those for several years. I think I'll save the stems from this years pumpkins and do it next year.
ReplyDeleteThe first ones I saw were made with hand dyed velvet. I want to do that, too.
YOU DID IT!!!
ReplyDeletethis will save you hundreds of dolaars ... haha
loves my e6000
Thank you so much for sharing this post!! I have been admiring those velvet pumpkins for a while now and will have to go look on my pumpkins for the stems...I am going to make these for gifts for next season! Love how pretty they are on a table! Thanks again!
ReplyDeleteMiss Bloomers
Yvonne, this is a really well done tutorial. I really appreciate all the details that you have included, such as the details on the different fillers and which glue works best! Thank you so much!
ReplyDeletei tried my hand at it & didn't go so well or i wasn't patient enough! :) i'll def try again! & the long doll needle can be gotten at any notions store?
ReplyDeleteTo fleur cottage: Yes, I think I got my doll needle at a JoAnn Fabrics.
ReplyDeleteI hope you will give it another try!
All my best,
Yvonne
Those are adorable - I'll have to save this for next year.
ReplyDeleteso kind of you to share this project . . Thank You! I am going to have to work out what to do instead of real stems as I no longer grow pumpkins and the shop bought ones have most of the stem removed. Looking forward to getting crafty soon!
ReplyDeleteYvonne would you believe I was just going to ask you for a tutorial on these lush pumpkins!
ReplyDeleteYou always do everything just right, and have several time saving tips here!
Love and Hugs,
Karena
Art by Karena
They are beautiful! I will have to make at least one! lol Thank you for sharing.
ReplyDeleteBlessings My friend,
Definitely will try these for next year! Thanks so much for the tutorial, Yvonne. I doesn't look too difficult once you have all of the necessary 'supplies'.
ReplyDeleteSuper tutorial. I will definitely make some for next year. Thanks. Hugs, Marty
ReplyDeleteI love the stem in the first picture. What a great idea and I love the tutorial!
ReplyDeleteBeckie
Thank you for figuring this out for us! I have wanted to try making these for a long time, but could see that there was a plethora of ways that it could go so, so wrong. You have saved us all alot of time and a few dollars too! I will be cruising through the neighborhood plucking stems off the pumpkins in everyone's big trash :)
ReplyDeletexo, Andrea
Hi Yvonne,
ReplyDeletethat is a great tutorial. Thank you so much.
Best greetings, Johanna
Thanks for sharing. I can't wait to make one.
ReplyDeleteThank you so much, Yvonne! I have been wanting to make some of these. I have never worked with poly beads before but will try and find them here. AND, I have never heard of E-6000 glue but it looks like a marvelous product. xo Diana
ReplyDeleteGreat tutorial Yvonne, Thanks for the share, I'm book marking it for next year, lord willing! Love the idea and the best tutorial I have seen yet! Thanks so much and have a wonderful and Blessed happy Thanksgiving! Hugs Marilou
ReplyDeleteI love those pumpkins and I always said to myself...I wonder how she makes them and bingo here is the wonderful tutorial! I will make them in a few colors next year! Thanks so much. Happy Thanksgiving.
ReplyDeleteCome on over for a piece of pumpkin bread pudding. FABBY
Yvonne, these are lovely and I think I could make one with your great instructions! Do you spray the stem with any kind of sealant?
ReplyDeleteYvonne, I have two posh pumpkins that I purchased. Would love to have more, so thank you for the tutorial. I'll need to find some stems. Thanks for the hint!
ReplyDeleteHappy Thanksgiving! ~ sarah
Hi Yvonne, Where do you get the poly beads and the adhesive? Are they in stores or online? Your pumpkins look great. I have been saving the stems of my fall pumpkins to do some posh pumpkins...the mini pumpkin stems will not come off with out a fight!
ReplyDeleteWow! What a sophisticated addition to any setting. You've done a great job providing a simple to follow tutorial.
ReplyDeleteTo answer some questions:
ReplyDeleteI did not use any sealant on the pumpkin stems.
Poly bead fill is used to fill stuffed animals and dolls. I found this at AC Moore. The E-6000 should be easy to find at any craft store.
Yvonne
Thank for sharing this.. I wasn't impressed with the fiberfill either.. but the beads.. now why didn't i think of that! I love the idea of the doll needle.. Thanks so much!! Happy Thanksgivings.xo marlis
ReplyDeleteWhat a great tutorial! These are just gorgeous! Thanks for sharing!
ReplyDeleteYou make it look so easy! Definitely will have to give pumpkin-making a try...
ReplyDeleteHugs,
Pam
Yvonne, I just came across posh pumpkins at a retail store yesterday, so you can imagine my delight when I saw that you posted instructions to make them. I have the stems, and saving this idea for next fall.
ReplyDeleteSuch a cute idea!
ReplyDeleteHave a blessed Thanksgiving.
- The Tablescaper
I wondered how the stems were attached to the pumpkin! I've seen some for sale that didn't look all that great- guess they need your tutorial! LOL Yours are so pretty, Yvonne! :-) Sue
ReplyDeleteLove, love Yvonne...thanks so much for sharing!!!
ReplyDeleteAdorable!
ReplyDeleteHi Yvonne...I just saw these in a gift store near me and they wanted $24.95 for just the small ones (about the size of my fist.) Then the larger ones, grapefruit size, they were asking $32.95. I inspected them pretty well and they we made exactly like your! These are beautiful...I think yours are even prettier. Thank you for the tutorial and tip on cutting a deal to get the pumpkins stems. This is a great post.
ReplyDeleteI saw this tutorial on your sidebar....I admired the pumpkins from last season....I saved the pumpkin stems and they all rotted...so what is the secret to drying them?....Thanks Yvonne...your pumpkins are gorgeous....My sister just bought some Plush Pumpkins and gave them to me as a "just because" gift...would love to make some...
ReplyDeleteLove this. I have been looking for a economical way to make these things. The antique store was selling them for $45 a piece and I knew they couldn't be that hard to make. I think they stuffed them with gold coins or something.
ReplyDeleteUm again... LOVE THESE. You have the most ingenious ideas.
ReplyDeleteNice tut I am going to try making these adorable pumpkins!
ReplyDeleteYvonne, are the poly filler beads the light fluffy ones or the heavier plastic looking ones? Thank you so much for this tutorial; I have just ordered some silk velvet, as I'm certain no one around here has it! We live 45 minutes from civilization and 2 hours from the closest Michael's!
ReplyDeleteThe poly filler are plastic beads.
DeleteThanks Yvonne......I made the 2 1/2 hour trip to the nearest Joanne's yesterday and picked up a package! Gathered some acorn caps from the yard and going to try those tiny jewels! (I had seen some comments from others about how hard the styrofoam beads were to manage, so wanted to make sure I got the right ones!!)
ReplyDelete