What does a girl do on a very snowy, snowed in day? When the wind is howling and the temps are flirting with single didgits?
Make a snowflake pillow. And the best part... it's made out of BUTTONS!
This project was so fun. It took just over an hour from picking out all the white buttons from my button jar till I stuffed the pillow cover with an insert.
Even if it's not snowy where you are... this pillow will bring a little winter white to your decor...
I'm participating in
NO-SEW WARM AND COZY HOME
The link to all the other warm and cozy no-sew projects are at the bottom this post.
The Button Snowflake Pillow has to be one of my very favorite projects I've ever done. I just loved going through all those pearly white buttons and making something out of them. Some of the buttons were my grandmother's.
STONEGABLE NO-SEW BUTTON SNOWFLAKE PILLOW
white buttons
pillow cover
hot glue gun
pencil
ruler
pillow insert
pillow insert
1. Gather buttons and put them on a large plate. This makes them easy to pick through.
2. Find the center of your pillow and lightly draw a long vertical line intersecting the center (mine was 10 inches on each side), a long horizontal line the same size intersecting the center and even on both sides.
Make a 2 diagonal lines even on both sides (mine were 7 inches) intersecting the center not as long as the vertical and horizontal lines.
You will have 8 spokes.
The horizontal and vertical spokes will be longer and the same distance from the center.
And 4 diagonal spokes all the same size but smaller than the horizontal and vertical spokes.
3. Glue one large button to the center of the spokes. Follow the diagram. Glue 2 big button to the vertical line, as shown, #1 and 2.
Glue 2 other big buttons to the horizontal line, # 3 and 4.
4. Add button to diagonal lines, 5a, 5b, 6a, 6b, 7a, 7b, 8a, 8b. See diagram.
5. Glue buttons to the vertical line. Use different hues and sizes of buttons.
6. Glue buttons to the horizontal line. Use different hues and sizes of buttons.
7. Glue buttons to diagonal spokes, 5,6,7 and 8. See diagram.
Draw small spoke lines 9, 10, 11, 12, 13, 14, 15 and 16. I made mine 5 inches long.
Glue small buttons to spokes 9-16.
8. Add buttons 17-22, according to the diagram, on the vertical and horizontal lines 1,2 3 and 4.
9. Add 3 buttons 23- 25, according to the diagram, on diagonal lines 5,6,7 and 8.
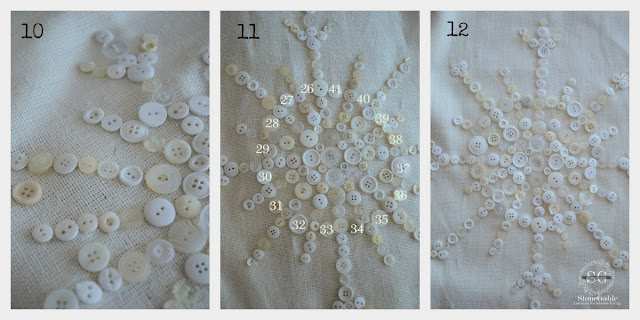
10. Measure a circle around the snowflake centered on the center button. Mark a light dot between the spokes, as shown.
11. Find a button that will fill that space and glue buttons 26-41 into place. It's okay to vary the size of the buttons to make them fill the space.
12. Finished snowflake pattern.
Iron pillow cover and stuff with a down pillow form.
My pillow cover came from the Pottery Barn Outlet. I think it was a 22 inch pillow and my form was 24 inches.
Join 5 other talented blogger for their WARM AND COZY NO-SEW PROJECTS!
I just love love love working with these creative girls!
Remember to


.jpg)


Yvonne, I love your snowflake pillow!
ReplyDeleteoh this is truly adorable and creative and pretty! Especially when I see that you didn't have to sew them on, only glue them. Great project!
ReplyDeleteThat is so pretty! Very special too since you used some of your grandmother's buttons. You are so creative!
ReplyDeleteFabulous pillow and the fact you have so many sweet little white buttons is amazing. What a beautiful keepsake to use those treasured buttons. This same idea would be lovely if framed, huh? I am so honored to be amongst this group of ladies and these events are so fun to be part of. Glad you're in it with us. Btw, that snow pic is awe inspiring.
ReplyDeleteThis is stunning Yvonne...I adore anything with old buttons. I so wish I was close to a PB outlet...I think I'd be there once a week! Hope you are keeping warm. We are getting more snow tomorrow so it will be heading your way after that I'm sure. I'm already ready for spring. :o) Love being in this group with you!
ReplyDeleteSimply beautiful! And perfect for me...sewing is my nemesis.
ReplyDeleteHi Yvonne, I too am a button collector! I have very old ones and many new interesting ones too, and some that just came as extras with my hubby's shirts, but I enjoy them all. Your pillow is gorgeous and so quick and easy! Stay warm today. It is very cold here in CT and I am imagining that you are in a deep freeze too. Linda
ReplyDeleteSo pretty! I too wish I lived by a PB outlet. I have seen a smaller version of this pillow at Hobby Lobby though! Love your beautiful view also, Yvonne!! xoxo
ReplyDeleteThis is lovely, Yvonne. Thanks for sharing.
ReplyDeleteYour snowflake pillow is too cute Yvonne!
ReplyDeleteYou are so good..this is fabulous looking! Happy New Year Yvonne...keep the talent and inspiration coming:)
ReplyDeleteWhat a pretty project! This turned out stunning! What a classy idea for the use of collected buttons, I wish I saved all my stray buttons now :0)!
ReplyDeleteStay warm!
Smiles!
Terry
Perfect it is just darling and no sew is all the better.
ReplyDeleteJust gorgeous, I may have to give this a go!
ReplyDeleteReally cute! I first thought you had to sew them all on. Like your idea better. Hate sewing buttons. Thanks for sharing.
ReplyDeleteYour pillow cover turned out cute Yvonne! Stay warm and GO EAGLES!!!:@)
ReplyDeleteI love this Yvonne. I'm pinning!
ReplyDeleteLove your snowy-weather pillow! Thanks so much for sharing it! :D
ReplyDeleteThis is adorable! I love it and couldn't believe you could GLUE the buttons on! You are amazing. Did you just make this up or find it somewhere? Fabulous!
ReplyDeleteLOVE IT Yvonne!!
ReplyDeleteGorgeous and simply elegant, Yvonne. I love it! Your tutorial for creating the snowflake was thorough and easy to follow. I've really enjoyed participating in our monthly no-sew projects each month. BTW - I'm totally jealous of your snow!
ReplyDeleteThis is a lovely, wholesome blog. Why do you have an advertisement of a scantily clad women taking her clothes off called "Play free-League of Angels" it may offend some of your readers.
ReplyDeleteSo sorry about that. I had no idea. I got in touch with my ad guys and told them to block that ad. Thanks for letting me know.
DeleteOh my, this is gorgeous and truly elegant. You have much more patience than I have, but the end result is fabulous. Peggy
ReplyDeleteI love your PILLOW...buttons are such a delight...they always bring a smile to my face. Happy New Year Creative Friend. xoxo
ReplyDeleteYour Pillow is so pretty. What a marvelous idea. You certainly mad it very quickly.
ReplyDeletehugs Kay
I love this project, Yvonne! I have bunches and bunches of button, some vintage and some new, and would love to use them for a project like this. I suspect that this will be shared all over blogland!
ReplyDeleteSuper cute, and your tutorial is quite thorough! I'm off to see the other projects!
ReplyDeleteJenna
Yvonne,
ReplyDeleteWoW!!!
Hot gluing the buttons on...I would have NEVER guessed!!!
This is beautiful, dear friend!!!
The pillow will become a keepsake by using vintage buttons!!!
Better make another one for the children to share! (wink! wink!)
Fondly,
Pat
Yvonne, your pillow is outstanding! Perfect for these cold months and I'm a sucker for white and cream buttons! Jane
ReplyDeleteThat turned out so nice! What a cute idea!
ReplyDeleteI LOVE this Yvonne! You always have the best ideas. Blessings to you in 2014 dear lady, Patti
ReplyDeleteBlessings to you, too!
DeleteThat's a beauty, Yvonne! I love your snowflake pillow!
ReplyDeleteI adore your snowflake pillow Yvonne! This is my kind of project, I can handle a glue gun much better than a sewing machine :)
ReplyDeleteThis is an inspiring post. Very creative!
ReplyDeleteJune
This if fabulous!!!!!! But just letting you know...you had me at "NO SEW"!!!!! hugs and the happiest of New Years to you and yours...HUGS and LOVE!!!!
ReplyDeleteI love this as I hate sewing on buttons. xo Laura
ReplyDeleteI adore this pillow so much! I made a simple no sew Valentine one yesterday:) Tis the season. Have a great weekend Yvonne!
ReplyDeleteI just wanted to say I love your pillow!!
ReplyDelete