I have a very very fun project for you!
Large numbered tags!
They will help you ORGANIZE your home, and if you are like me I sure need that!
Large numbered tags!
They will help you ORGANIZE your home, and if you are like me I sure need that!
These sturdy tags look very Pottery Barn-ish and would look great as a decorative and/or organizing detail on almost anything...
I made these big updated number tags for about $3.00... for 10!
I saw a set of wooden number tags on Etsy for $77.00 ... for 10! YIKES!
The fun tags are going to look great on the baskets in our bookshelves... I'll show tomorrow!
Here's how I made...
Large Number Tags
Materials:
10 3 inch wooden discs
drill
white and black craft paint
small piece of brown paper bag
printed numbers
scissors
pencil
tape
tape
stylus or pen
thin paintbrush
twine
1. 10 discs and my drill. I got the discs at AC Moore.
2. Drill a hole near the top of each disc. I used a 15/64" drill bit so the twine will fit through the hole.
Paint the discs with 2 coats of white craft paint
3. Here's a FABULOUS painting secret... Tear off a small piece of brown paper bag and fold it so it handles easily. Rub (medium pressure) the bag over each disc. This will knock down the nap of the wood, making the surface much smoother and easier to paint on.
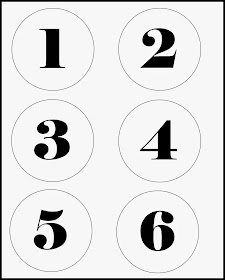
4. Print out numbers 1 to 10 and cut them out. See below for numbers.
To print these numbers, right click on the numbers and click "save image as". Save it to your desktop or a file.
Then you can open desktop or the file and print out the numbers to fit an 8x10 (portrait) area.
The printed numbers will fit a 3 inch disc.
Sorry, I don't know how to make a pdf file yet. But it's on my to-do list.
5. Turn each number over and rub the graphite of a pencil over it to cover the number.
Here's another great tip... buy graphite paper and you will never have to do this step. I ran out of it. You should be able to get graphite or transfer paper at almost any craft store.
6. Turn the number up and tape it in place on your painted disc. Use a stylus or ball point pen and trace around the number.
7. Paint the numbers in black craft paint, let dry and add twine through holes of the tags.
TA-DA!
Think of all the possibilities! Square, oval, any fun shapes, different colors, distressed and chippy, clean and crisp, words, ABC'S, symbols...
I also made some chalkboard paint tags I'll be showing you next week.
Stop back tomorrow and see what I did with all these tags!
Remember to


Super cute! Thank you for the nicely detailed tutorial. Happy New Year Yvonne!
ReplyDeletePerfect, I love them and thanks for the printable :) Happy New Year, Yvonne!
ReplyDeleteHappy New Year….thanks for the continuous inspiration!
ReplyDeleteThese are really cute! Thanks for sharing!
ReplyDeleteThose are so nice. Now all I need is a wireless printer. Happy New Year, Yvonne!
ReplyDeleteVery Nice Yvonne...and I agree with Sharon about the "nicely detailed tutorial". Happy New Year too!
ReplyDeleteLove these! I need to get a new printer for my crafting projects what would you recommend.
ReplyDeleteI also want to tell you that I love your blog. It makes my day getting an email from Stone Gable. Have a blessed New Year!
Callie
Callie, thanks for the sweet comment! It makes my day when I know that a reader is enjoying StoneGable! I really don't have a preference when it comes to printers. I will say, I have a wireless printer and I just love that feature. My best advice is to get a user friendly printer! Hope this helps!
DeleteCute idea! Can't wait to see how you'll use them. How are those new knees doing?
ReplyDeleteKnees are s-l-o-w-l-y getting better! It's going to be a process. But I am thankful that by summer I should be able to garden on my knees. Thanks for asking!
DeleteI guess I am not very crafty since I am a little confused about the last 2 seps but I think I would need words on mine anyway:):) HAPPY New Year and hope to see you soon!!!! XOXO
ReplyDeleteHi lovely lady.
ReplyDeleteThanks so much for this great Idea. Hoping you have a wonderful 2014 New Year with your family.
xxoo
Diane
Yvonne, I love the tags! Thank you for sharing. I wanted to wish you and your family a very happy New Year! I always enjoy your blog and your wonderful recipes!
ReplyDeleteJane
Flora Doora
Love it and PINNING!!! Chrisitne from Little Brags
ReplyDeleteYou make this look so simple! And what a steady painting hand you have! I have a math aversion, so I think I'll try ABC's instead of 123's!
ReplyDeleteCan't wait to see how you use them.
These numbers will be so useful, and they look snazzy! Thanks so much!
ReplyDeleteLove these Yvonne! I have number tracing templates that I use for crafts with the grandkids...going to use them! I love projects like these that you can share with the grandkids and keep them busy on a rainy day at Grandma's!
ReplyDeleteHave a Happy and healthy New Year!
Lois
DEFINITELY making these!!! Thanx for making it so easy!!!
ReplyDeleteYvonne...thanks so much for this great tutorial. Just tried to pin it and it came back that there was nothing to pin on this page. HELP.
ReplyDeleteBonnie
Maybe I missed it, but where do you buy the discs? Thanks.
ReplyDeleteThe discs came from AC MOORE. The were nothing special. Just some thin wooden discs.
DeleteThese are fabulous Yvonne! Shared on FB and Pinning :) xo
ReplyDeleteThese are so cool! I actually have some of these large numbers in glass though. I think that tags are just so cute!
ReplyDelete