There are just some jobs that I love to do!!! We were in DC for a work weekend at my daughter home.
They live in a 90 year old town home on Capitol Hill... the house has such great bones, and they have been breathing new life into it for the last 3 years.
This weekend Bobby helped Jonathan install real wainscoting in their dining room and I helped Jacqueline transform an old buffet into a beautiful "grey lady"...
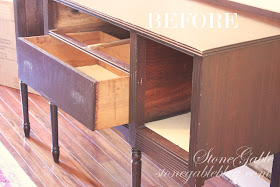
This is how the buffet looked before we let the paint and brushes do their magic...
Great lines, but very tired! We had already removed the doors, one drawer and hardware.
We began by giving it a good scrub and cleaning.
Then we turned it upside down on her dining room table to paint it. It is so much easier to paint chairs and tables and buffets like this upside down. We were painting while the boys were working in the same area... now that's what I call togetherness!
This was the first piece Jacqueline had ever painted. It was so much fun to instruct and help her.
After two coats of Annie Sloan Calk Paint in Paris Grey we gave the body of the piece (not the drawers or doors) a light coat of clear wax and massaged it into the paint with 320 grit sandpaper. I learn this technique and I almost always use it. It leaves such a gorgeous finish on a piece.
Our work station was a the end of the table.
The doors and drawers were also given two coats of ASCP in Paris Grey and left to dry.
Then we put an ASCP Pure White wash over the Paris Grey and wiped it away with cheese cloth. This leaves a striped/grainy look. This is my favorite technique.
When everything was dry we put a thin coat of clear wax over the doors and drawers, and messaged the wax into the wood with 320 grit sandpaper.


Wow! Yvonne, that's GORGEOUS! Thanks for sharing the tip about the wash, I had no idea! It's always fun to teach people how to paint furniture...it's probably one of my favorite things to do! Oh...and the hardware on the cabinet is beautiful, too! Happy New Year! xo
ReplyDeleteOh my what a stunning result. I'm gald you were able to help her.
ReplyDeleteHugs
Kay
Beautiful piece! Thanks for the tips...
ReplyDeleteHappy New Year.
Absolutely stunning, love that piece - she must be so happy! Not only does she now have a heavenly gorgeous pieces to add to her world, but did it with YOU! : - ) Nice plan.
ReplyDeleteHappy New Year, lady!!
Good for Jacqueline. Pretty piece.
ReplyDeleteBeautiful! Would love to see a photo of the full piece. I haven't tried chalk paint yet, but am considering it on a thrift store end table.
ReplyDeleteVery pretty, Yvonne! I love the hardware, too.
ReplyDeleteYvonne,
ReplyDeleteExquisite!!!
Your cabinet transformation is truly inspiring!!!
I miss viewing your Tutorials, Tips and Tidbits Linky Party each week!
Fondly,
Pat
It turned out beautifully!!! Jackie is a lucky girl to have you!!!!! XO
ReplyDeleteI adore the transformation! You ladies did a wonderful job! I only want to see a demonstration of your favorite technique, clear wax with sandpaper! (I'm a visual learner). I will need to add Paris Grey to my stock. Thanks for sharing! -Bev
ReplyDeleteGreat job mom.
ReplyDeleteso beautifull! Love the grainy look. hugs, Cristina
ReplyDeleteI LOVE the color, thank you for the tutorial and paint colors/techniques. I am going to do the same thing to my grand-daughter's crib and vintage dresser. My daughter is doing the nursery in pink & gray.
ReplyDeleteDenise
This is gorgeous. I love the paint and thanks for your tip about the the was and sandpaper. I don't think I've ever tried anything like that. You daughter's a lucky lady to have you as here design and decorating mentor.Thanks for sharing this wonderful transformation.
ReplyDeletePeggy