Sunday, December 4, 2011

A NOTE TO MY DEAR READERS...


No fancy pictures, or colorful font...just some plain talk today!

Today is my last post here at StoneGable.

CHILDREN TELl THE CHRISTMAS STORY~ SUNDAY SCRIPTURE


The Christmas Story...Told By God


At that time the Roman emperor, Augustus, decred that a census should be taken throughout the Roman Empire. This was the first census taken when Quirinius was governor of Syria. All returned to their own ancestral towns to register for this census. And because Joseph was a descendant of King David, he had to go to Bethlehem in Judea, David's ancient home. He traveled there from the village of Nazareth in Galilee. He took with him Mary, his fiancee, who was now obviously pregnant.

And while they were there, the time came for her baby to be born. She gave birth to her first child, a son. She wrapped him snugly in strips of cloth and laid him in a manger, because there was no lodging available for them.

Friday, December 2, 2011

UNLEASH THE POWER... OF THE SLOW COOKER!


We all have busy schedules... and cooking dinner is probably the last thing we want to think about! Especially at 5:00 pm!

A slow cooker can be a LIFESAVER at dinner time...


Wednesday, November 30, 2011

THE GREAT CHRISTMAS DINNER PARTY


Let's have a dinner party! Are you jumping up and down.... excited and ready to start planning? Or are you filled with anxiety and stress... thinking about all the work involved? 

Most of us love to go to a dinner party... and love the idea of a dinner party... but many of us don't love hosting  them. 

Let's see if we can change all that!  This post is all about making dinner parties enjoyable and easy...  for the hostess... from planning to clean up!

 I'm setting a table for a dinner party and sharing lots of tips with you. And I have lots and lots of tips!!!!!  Hope some are helpful to you as you plan your next Great Dinner Party!

Tuesday, November 29, 2011

STONEGABLE'S FARMHOUSE KITCHEN REVEAL


Warning: This is a long post! Grab a drink and settle in...  


You have been VERY VERY patient and kindly persistent!
Last week I posted a Thanksgiving buffet on the kitchen island and had so many comments about getting a "peek" at the new kitchen.  I knew I could not keep my dear readers waiting any longer.


Here is look at StoneGable's FRESHENED UP Farmhouse Kitchen...


After cleaning up the Thanksgiving buffet I thought this would be a good time to show-and-tell. The Christmas sleigh will soon be dropped on the kitchen and all the decorations might make it hard to focus on the re-do!


The inspiration for my new, fresh decor is StoneGable itself. 

StoneGable is a farmhouse inspired home. We live here in the bucolic countryside of Lancaster County Pa. 


I am on a new mission these days!
I want to take my home back to it's farmhouse roots... that is, with a twist (there is always a twist when I am involved)... to  play to the strength of my beloved StoneGable.

What better place to make an earnest start than the heart of the home... StoneGable's kitchen!


There were many elements that we did not need to change. I really loved my original kitchen, it just needed some updating. So after a year of research and planning we began the journey to reclaim StoneGable's farmhouse style!


I envision a kitchen.. and eventually a home... that is warm and inviting but calmer, sleeker... more simple and less fussy...infused with my own personal style. All elements keeping an upscale farmhouse feel.


Thankfully StoneGable's kitchen did not need a total renovation! Just a healthy face-lift! After al,l I have used it very hard over the last 17 years! 

We had just painted the walls Benjamin Moore Springfield Tan earlier this year so we stayed with that color.

Here are a couple of BEFORE photos...


 (The old kitchen table and chairs were already removed in this photo. We were waiting for our new table to be built.) 


The original kitchen was built in my garage. My builder's father was a custom cabinet maker and he built my cabinets from scratch! When my powder room sink was being installed 17 years ago, the plumber said that he had not seen a kitchen built like this in 35 years.

Keeping most of my cabinets was a MUST!  And the few we had to replace were built the same as  the originals. All drawers were retro fitted with easy-glide closures.

The cabinetry and woodwork was repainted as they were originally, with Benjamin Moore Atrium White oil based paint. At first the cabinets were to be glazed... but after much thought I decided against it... opting for a fresh pure white cabinet.


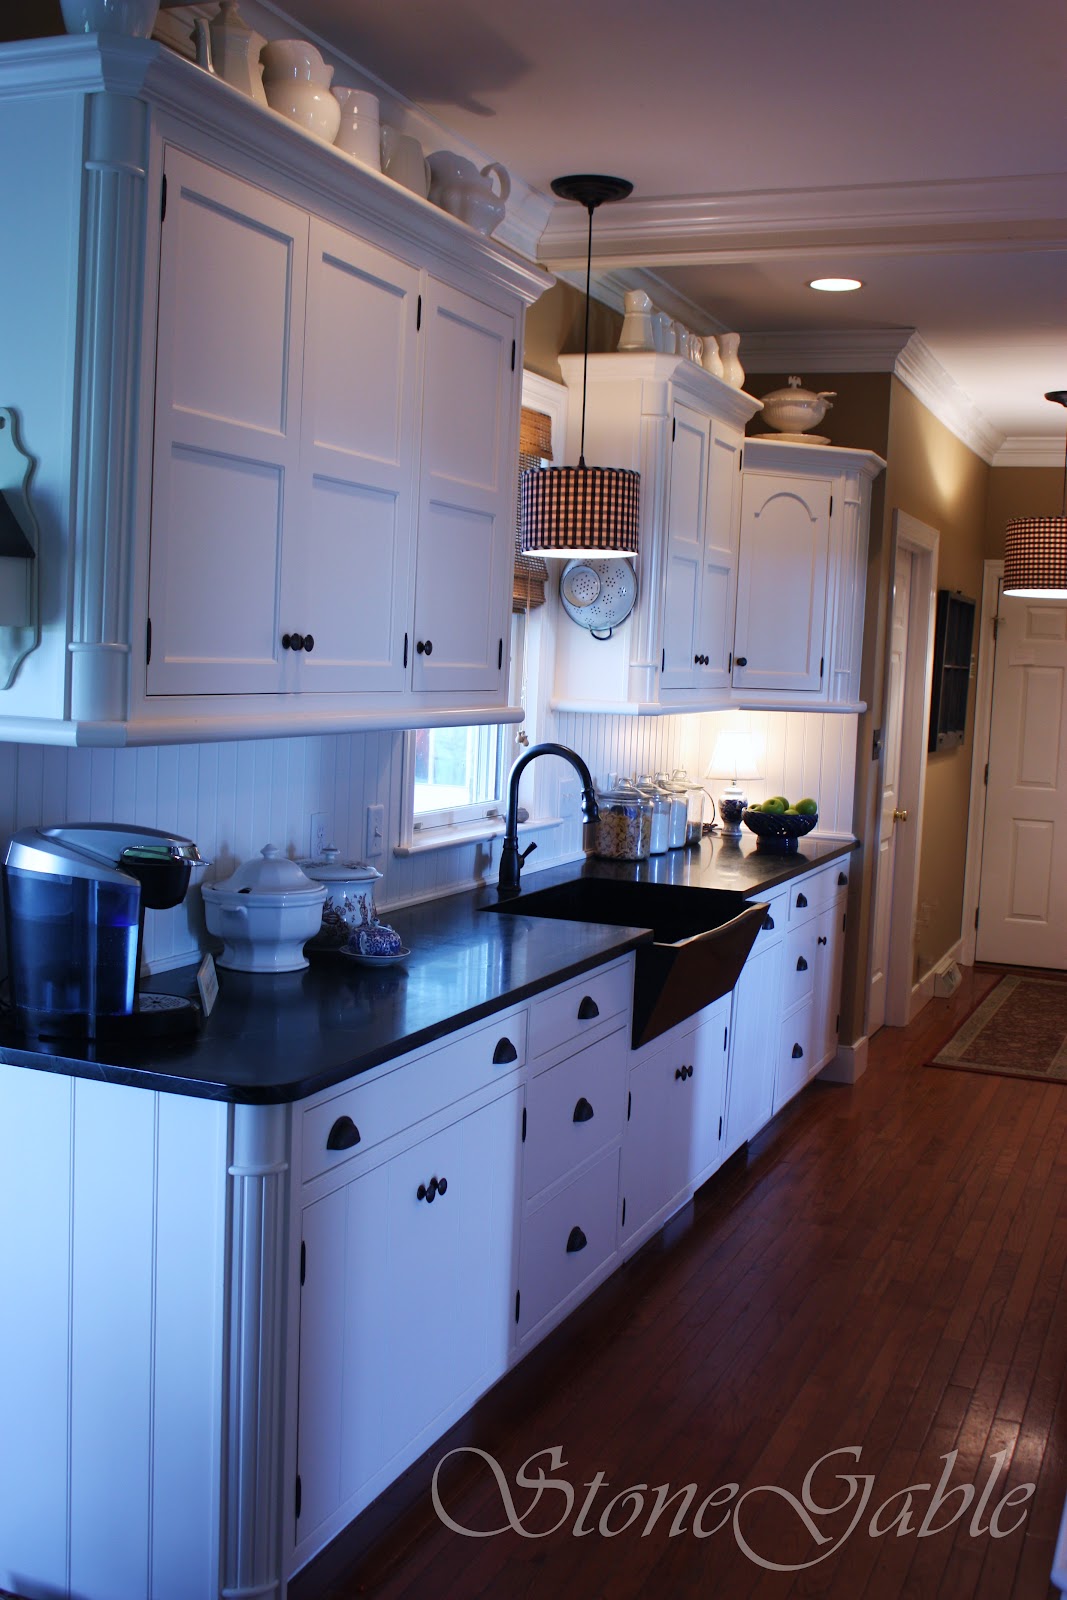
The top cabinetry has recessed panel fronts and the bottom cabinets are a beaded board.  The original appliance garage was removed adding more counter space. 

The top of the cabinets is the perfect spot to display my pitcher collection. We also added  the crown molding.


I never had a back splash behind my counters until now. I just never knew what I wanted. Bead board painted the same fresh white as the cabinets delivers the farmhouse feel I love!

Simple oil rubbed bronze hardware replaces the old wooden knobs. I love the cup style pulls for the pull-out drawers.


Notice the corners of all the cabinetry. They have a pretty detailed rounded edge.

Bull nose trim accents the cabinets. This is all original.  After 17 years of abuse they were dented and well-loved! My contractor made them look like new!


I have always wanted a double oven. And the plan was to put a double oven next to the big pantry.  This is how this area looked BEFORE the re-do....


Unfortunately, I would have had to lose one of my pantry doors and the pretty glass cabinet. So we opted to leave the pantry as is, save the mullioned cabinet and put the microwave in a hide-away cabinet under it. Out of sight, but very accessible. 

Lighting the glass cabinet is one of the projects I have yet to complete.

The upside to this compromise are the 3 large drawer gained under the microwave and the styling of that area.

The AFTER...


The section of kitchen with the most change would have to be the "cooking area". 

This is the BEFORE...


And AFTER...


Because I could not put a double oven on the pantry wall, I compromised and put one built-in convection oven under a new gas cook top

The biggest change to this area is the ventilation system and the pretty new hood that hides it! Before, the  only ventilation system was the fan under the microwave. I was always setting off smoke alarms!

The new system is vented to the outside of my home! 

And the hood has a pretty shelf that I can decorate... with moderation!

I kept the glass mullioned cabinets. They were originally lit, but we updated the lighting inside too.


This area was originally going to be purely neutrals. But I needed a little color! 

I find blues and whites look so fetching with neutrals and give them an upscale kick!


The back splash was a huge decision for me. I wanted something that in 5 years would not look dated and would work with any decor. Hopefully this is understated and a classic.


I like to keep a little area for cooking oils, salt and pepper near my cook top. The covered bowl holds kosher salt and the little chicken has fresh cracked pepper. You can see the soft graining in the soapstone in the image.


Changing the counter tops gave the kitchen a very dramatic look! I have dreamed of soapstone for years! And I am thrilled with them. They are soft looking and very tough. And just so beautiful!!!!!

StoneGable's trough sink was custom made using the same soapstone that graces the kitchen counter tops.  It can handle any kitchen clean-up!

The goose neck oil rubbed bronze faucet has a great built-in sprayer!

The dishwasher is hidden behind the "cabinet" just to the right of the sink.


I am trying very hard not to fill the counter space up with vignettes and  kitchen wares.  Just a couple simple well-placed things here and there!


Big glass jars hold sugar, flour and other goodies!  Pretty vintage blue and white cups serve as scoops!


A new pendant lamp with a black and tan checked drum shade hangs over the sink. This pendant was fitted into a recessed light.

No curtains here, just a textural rattan shade.

A vintage colander hangs near the sink ready to be used.


The island was another compromise. We had first hoped to build a whole new island and paint it a different color, probably black. I wanted it to look like a piece of furniture.

However, in the end we decided to keep the island and tweak it. And am I glad I did!

Here is the BEFORE...


And the AFTER...


The island was raised and put on bun feet to look more like a piece of furniture. I am tall so the extra height saves my back!

  Bull nose trim was also added to the base of the island. The cabinets on the left and right sides of the island are pull-out trash cans.

The soapstone counter top is 2 feet shorter than the original island (it was huge) making more room to move around the kitchen!


Pretty corbels were added to give a dressed up feel.


A big antique tool box sits on the island. 


I do embellish this with seasonal decor... old habits die hard! Right now it is filled with creamy white dishes!


A large tray chandy hangs over the island.

I looked forever for this! And found it a Lowe's! Can you believe it?

It looks like a tray of pillar candles. Using different watt bulbs, gives this the look of real candles!
I wish you could see this in the evening... sooooo pretty!


The stools at my island are a project that I have not finished. Mostly, because I was not sure if I wanted to get new ones or not. These little seats have been a part of my home for 25 years! They are filled with wonderful memories of little squirmy children sitting at the counter!

I think I'm going to keep them, but paint them graphite and antique them a little. Wouldn't a brown and black plaid or buffalo check cover look so smart on them?


The other area that still needs work is my "mudroom"... the hallway that leads to the garage.  I have all the decor to make the changes but I just need a little time! I must make an effort to finish this right after Christmas!

To see what I have planned click HERE.


And the only new appliance we need is the refrigerator.  The one we have is still working great and we have a working frig in the garage as well. When one goes, hopefully soon, we will get a frig that we can customize to look like the rest of the kitchen.

I hope you have enjoyed the little (long) kitchen  tour! 

Please visit often!

You are welcomed back any time!


Pin It

I am participating in:
WOW US WEDNESDAY at Savvy Southern Style


Photobucket

Monday, November 28, 2011

ON THE MENU MONDAY~ WEEK OF DECEMBER 5, 2011


StoneGable is slowly being dressed in Christmas finery! I love the process of decorating for Christmas as much as the final product. 

I don't have many snowmen, santas (except the little wooden triangle Santa my son made in nursery school many years ago) or ready-made decorations anymore.

Over the last few years I have let go of many Christmas decorations and have been collecting "elements". Sticks, picks, greens, pinecones, snowflakes, etc. Each year I round up the every Christmas box and create. I think I love the creative process the best. Picking a theme, shopping the Christmas area of my basement and  getting a few new new things as well. Working on new and fresh ideas for Christmas is so exhilarating. We have many many Christmas tradition that remain the same from year to year, but the decking-the-halls the same is not one!

Sunday, November 27, 2011

ON THE MENU MONDAY~ WEEK OF NOVEMBER 29, 2011


I hope everyone had a wonderful Thanksgiving! I spent this holiday with family and friends and ate waaaaaay too much! It was fabulous!

Christmas season has now started in earnest at StoneGable. We will be busy decorating the outside of StoneGable this week. I am making fresh wreaths for all of the front and side outdoor windows, the front and garage gables and front doors this year.  I just learned a wonderful new way to make a fresh wreath that is soooo easy and it looks spectacular!  Look for a tutorial very soon!

Then it is on to the inside. I usually start with the mantle and move on from there. This year I am saving my fall natural decor and adding yuletide elements to it for a more natural Christmas in our "family living" areas. The tall skinny kitchen tree will take on a whole new look this year... I am thinking about bird's nests sticks and twigs and grapevine.

The formal tree in the foyer will still be full of glitz and sparkle! At least for another year!

Christmas decorating, for me, is a process to be enjoyed! I do love the halls completely decked... but the process is..... SO merry and bright!

Now here's what's ON THE MENU...


MONDAY
Turkey Pie
Roasted Broccoli


Recipe: Individual Turkey Pies
Using leftovers from Thanksgiving is one of the small pleasures in life! Making something new and interesting from what I have in my refrigerator is always so satisfying to me! I am using my chicken pie recipe and substituting turkey. I am also making the crust from the wonderful recipe I discovered at FAITHFULNESS FARM. For the Turkey Pie recipe, click HERE.


TUESDAY
Planked Salmon On The Grill
Arugula, Shaved Parmesan, Pine Nuts In A Lemon Vinaigrette
Confetti Corn


Recipe: Arugula. Shaved Parmesan, Pine Nuts In a Lemon Vinaigrette
1 bag of FRESH baby arugula
1/4 cup shaved good Parmesan
3-4 TBS toasted pine nuts
1/4 cup good olive oil
juice of 1 juicy lemon
1/4 tsp dijon mustard
good dash of kosher salt

Put the bagged arugula in a large salad bowl. 

In a small jar add oil, lemon juice, mustard and salt. Put lid on jar and shake to emulsify. Pour just enough dressing over arugula to coat. Refrigerate the rest.

Add parmesan and pine nuts. Mix. Serve immediately!

Printable Recipe


Recipe: Confetti Corn
I met my dear dear friend Pinky through blogging and we have become close real-life friends! What a blogging blesssings!  She and I get together almost every week. I can't tell you how much she has enriched my life. This beautiful, petite, Liz Taylor look alike (when Liz was young) has such style and a natural easy way about her! And I am so happy that she is my friend! She had a milestone birthday party for her sweet Son-in-law and made this "kicked-up-a-notch" corn. Visit Designs By Pinky and get this yummy corn recipe. Great for Thanksgiving leftovers! Chick HERE to visit!

WEDNESDAY~ Slow Cooker Day
Smoky Slow Cooker Chili
Buttermilk Sweet Cornbread

Recipe: Smoky Slow Cooker Chili
If you like chili, you will be wild about this recipe. My sister, who is a fabulous cook, made this for a family gathering and it was a smashing hit!!!!! She adapted it from a COOKING LIGHT recipe. Thanks, Lisa! I love this chili and you too! This recipe makes a huge slow cooker full of chili goodness.
2 lbs ground pork
2 lbs pork shoulder, cut into 1/2 inch pieces
3 cups onion, chopped
1 1/2 cups green pepper, chopped
3 cloves of garlic, presssed
3 TBS tomato paste
1 cup beer
3 TBS chili powder
2 TBS cumin
2 tsp dried oregano
1/2 tsp ground pepper
2 bay leaves
2 (14 1/2 oz) cans of plum tomatoes, undrained and chopped
1 (15 oz) can of pinto beans
1 (7 3/4 oz) can of hot Mexican style tomato sauce
1 large smoked ham hock
1 1/2 TBS sugar
masa harina (corn flour~ not polenta), up to 1/4 cup
chopped green onions
shredded cheddar cheese
sour cream
lime wedges


In a large skillet sprayed with cooking spray, brown and chop the ground pork for about 5 minutes. Drain and put in slow cooker


Respray skillet and add pork shoulder. Cook until lightly browned, about 5 minutes. Add to the slow cooker.


Respray the skillet and add the onions and bell peppers. Saute for about 8 minutes until translucent and soft. Add garlic and cook 1 additional minute. Add tomato paste and cook an additional minute. Add beer and stir. Cook for 1 minute. Add this mixture to the slow cooker.


Add chili powder to the slow cooker along with teh cumin, oregano, pepper, bay leaves, plum tomatoes, pinto beans, tomato sauce and ham hock.


Cook on high for 5 hours. Add sugar and stir. Add masa harina a couple of TBS at a time. Stir in well and let thicken a little. Be patient.  Each TBS may take a little bit to thicken.


Serve in bowls. Pass the green onions, cheddar cheese, sour cream and lime wedges.
Printable Recipe

Recipe: Buttermilk Sweet Cornbread
1/2 cup butter, melted
2/3 cup sugar
2 eggs
1 cup buttermilk
1/2 tsp baking soda
1 cup white cornmeal
1 cup flour
1/2 tsp salt.

Preheat oven to 400 degrees. Grease an 8 inch pan.

In a large bowl, beat eggs and add sugar and combine. Stir in butter.
Combine buttermilk and baking soda and stir into egg/sugar/butter mixture.

In a separate bowl combine cornmeal, flour and salt.  Add dry ingredients into wet ingredients in thirds.

Pour batter into pan. Bake for 30-40 minutes until golden and a toothpick comes out clean when tested.

Printable Recipe


THURSDAY
Eye Roast On The Rotisserie With Pan Gravy
Muffin Tin Onion Gruyere Stacks
Roasted Carrots 

Recipe: Eye Roast On The Rotisserie With Pan Gravy
1~ 3lb beef eye roast
garlic salt
oil


Rub oil and garlic salt over the roast. Put the roast on the spit. Roast until internal temperature reaches 145 degrees for medium rare roast. Let rest for 10 minutes and slice thin. Serve with a little gravy.  


Recipe: Muffin Tin Onion Gruyere Potato Stacks
These are so delicious and very very easy! For the full culinary tutorial with lots of yummy pictures, click HERE.

5 baking potatoes
2 onions, chopped
6 TBS butter
1 1/2 cups grated cheese, Gruyere or cheddar
kosher salt
freshly ground pepper
heavy cream or half and half
cooking spray
thyme sprigs

Preheat oven to 400 degrees.
Thinly slice raw potatoes. I use a Mandolin but they can be carefully hand sliced into thin even slices. Set aside.
Melt butter (about 4 TBS) in a large skillet and saute onion over a low heat until translucent and slightly golden. Add 2-4 TBS butter in the pan and melt the butter. Set aside.

Grate cheese. Gruyere is my favorite but cheddar works great too! Set aside.

Spray all twelve muffin cups of a regular size muffin pan.

 Add 1 slice of potato to the bottom of each muffin cup. Salt and pepper. Add 1 more slice of potato. Top each potato evenly with 1/2 onion and butter. Add 2 more potato slices. Sprinkle 1/2 grated cheese evenly over potatoes. Add 1 more potato slice and salt and pepper. Add 1 more potato slice and evenly add the remaining 1/2 of onion and butter. Add 1 or 2 potato slices and  top evenly with remaining cheese.

Pour 1 TBS cream over each potato stack.

Bake for 35 minutes until potatoes are tender. Remove from oven and let rest for 5 minutes.

Run a sharp knife around the edges of each muffin cup and pop each stack out with a fork.

Garnish with thyme.


FRIDAY~ BOOK CLUB CHRISTMAS DINNER

SATURDAY
Chicken With Brussels Sprouts And Mustard Sauce
Herbed Roasted Potatoes


Recipe: Chicken With Brussels Sprouts And Mustard Sauce
Another recipe adapted from Cooking Light. This is easy to make and has such great flavors!
2 TBS olive oil, divided
4 boneless, skinless chicken breast halves
salt and pepper
1/2 cup chicken broth, divided
1/4 cup unfiltered apple cider
2 TBS whole-grain Dijon mustard
1 TBS butter, divided
1 TBS fresh parsley
1 lb brussels sprouts


Preheat oven to 400 degrees.
Wash and dry small brusssels sprouts. Put them into a bowl. Toss with 1 TBS olive oil and salt and pepper. Roast in the oven for 20 minutes, turning once. Remove from oven and reserve. Increase oven temperature to 450 degrees.


Heat a large skillet over high heat. Add 1 TBS olive oil. Salt and pepper the chicken and add to the pan.


Cook for 3 minutes or until browned. Turn and brown the other side. Put chicken in the oven to finish cooking, about 10 minutes. Remove chicken from pan and tent with foil.


Heat the pan over medium-high heat. Add 1/2 cup chicken broth and the cider. Bring the liquids to a boil, scraping the good brown bits from the pan. Reduce heat to medium-low and simmer for 4 minutes or until thickened. Whisk in mustard, 1 TBS butter and the parsley. Return chicken to the pan along with the brussels sprouts. Coat with the sauce and serve.


SUNDAY
Turkey Noodle Soup
Crusty Bread


Recipe: Turkey Noodle Soup
Save those chicken and turkey carcasses! They make the best soup! I'll make this early in the week and save it for Sunday after church.  I am adapting my chicken noodle soup and using the Thanksgiving Turkey carcass to make a big pot of delicious comfort-food soup! NO need to add additional turkey meat, unless you have some left over from that big turkey! Click HERE to see a tutorial of my very favorite soup! Lots of photos and tips!


Now What's On Your Menu...


~Please link your post using your permalink.
~Make sure you have a link back to ON THE MENU MONDAY on your post or  post a OTMM button from my sidebar in your post.
~ Please visit at least 2 other OTMM participants.