

I have recently been on a search for a few topiaries. They add such a touch of organic interest and natural beauty to almost any decor. While searching I learned that topiarires are also very expensive!!!!
I found some really stunning, rustic topiaries in a local shop... for $49.99 a piece.
Wanting to put 2 topiaries on my mantle this summer, the cost would be doubled. I knew could better spend almost $100.00, so I decided to make my own topiaries.
The rustic luxe look has my attention these days. But like all trends, they come and go~ so I 'm not investing big $$$ in decor that I won't have for the long haul! I have been collecting blue and white for years and love how it pairs with neutrals and rustics... and topiaries!

Using what I found here at home, I made 3 topiaries for free!!!! The only cost was my time. What do you have lying around the house that you could transform into a fabulous topiary?

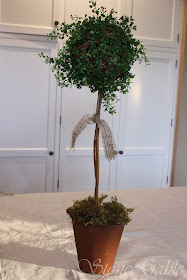
Rustic Summer Topiary
1 large willow ball
greens with tiny leaves
straight branches
container
Styrofoam
moss
burlap
hot glue gun
dust buster (clean-up as you go)
Cut greens and glue to the willow ball. I collect odds and ends as they go on sale and put then away for future use. I bought these greens for 70 % off.


I am participating in:
WOW US WEDNESDAY at Savvy Southern Style.
Table Top Tuesday t A Stroll Thru Life
Cut greens and glue to the willow ball. I collect odds and ends as they go on sale and put then away for future use. I bought these greens for 70 % off.


Glue greens until you have evenly covered the willow ball. These large willow balls originally cost me $4.50 a piece. I just keep collecting them a few at a time. If you don't have one or can't find them you could make a grapevine ball. I think that would work just as well.

It is interesting to leave areas uncovered so the willow branches show through.

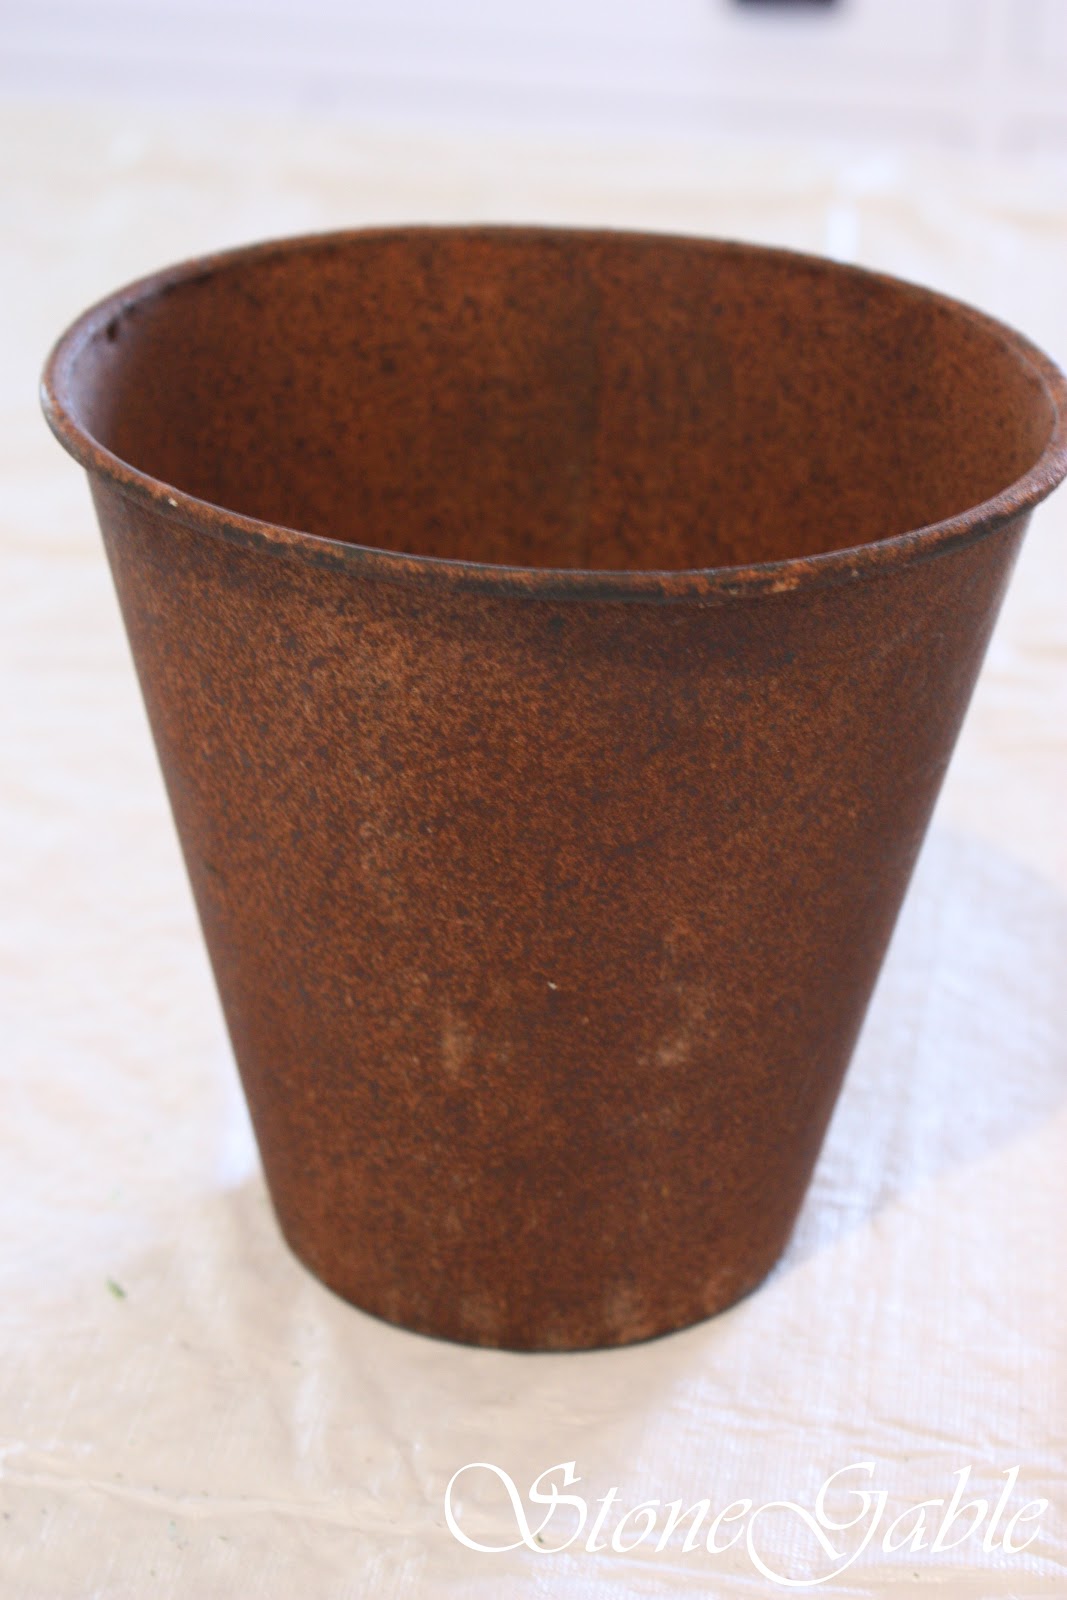
I found 2 rustic containers at a thrift store for 50 cents last winter and tucked them away for a future project. They were perfect for the base of the topiaries! Terracotta, galvanized or pottery containers would work well too. (See the interesting container I used at the end of this post!) There are so many really creative containers for a topiary!
Cut and secure Styrofoam in the bottom of the container. You could also rocks, sand or quick dry concrete as an alternative to Styrofaom.

The stem of the topiaries are dead hydrangea branches I had pruned early this spring. They were so light and straight, I put then in the garden shed thinking I'd use them to stake up things in my garden.
I chose to use these as opposed to a dowel rod, they look more believable. Take a walk and see what you can find in your own yard!

They were originally dead looking and washed out so I used a furniture touch up marker to give them life and a richer color.

Twist 2 or more branches together to make an interesting stem and secured each end with a rubber band.

Hot glue the stem into the willow ball. Liberally use the hot glue to secure.


Stick the other end of the stem deep into the styrofoam and liberally glue to hold.

Cover styrofoam with moss and tie a strip of burlap onto the stem to secure it together.


Enjoy!
I made 2 topiaries for my mantle.


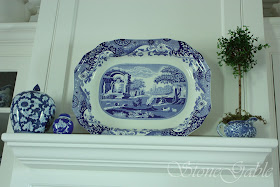
Be creative! I used an antique blue and white creamer as a pot for this little topiary.


It sits with a collection of blue and white china on the ledge of my new kitchen hood.

Topiaries can give life and interest to any area! They fill space and their height is so visually pleasing!

They are easy to make and don't have to be expensive. I hope I have inspired you to make a topiary of your own!

I am participating in:
WOW US WEDNESDAY at Savvy Southern Style.
Table Top Tuesday t A Stroll Thru Life
Oh my gosh I LOVE the topiary in the blue and white pitcher! What a great idea...and it's perfect where you placed it. Lovely post...I really enjoyed it. Have a great week!
ReplyDeleteOh, it looks so beautiful with the blue and white.
ReplyDeleteThese topiaries are just sweet and your mantle looks beautiful with the blue and white dishes and the topiaries. Thanks for sharing the how to's.
ReplyDeleteYvonne, your timing is perfect! I have been trying to find something for my living room mantle to replace my spring decor. Nothing was working for me, til now!!! I just love them. I love the simple touch of the little piece of burlap as well. They are beautiful! How sweet is that little one in the blue and white pitcher!! I can't wait to get started! Thank you for sharing this!
ReplyDeleteI love the look of topiaries. You have done a great job i creating a great look. Thanks for the tutorial so we can duplicate these as well. Just lovely!
ReplyDeleteTammy
I'm so glad the link to your post finally worked! I tried earlier today to get to post but "page not found" kept coming up and I knew this was going to be a great post and it is!
ReplyDeleteThese are beautiful and I am going to have to try my hand at making my own!
Thank you for the step by step instructions!
Mary
From Virginia
Hi Yvonne! Oh, you've done good! I love your little topiaries and your vignettes! :)
ReplyDeleteBe a sweetie,
Shelia ;)
They're so pretty, Yvonne! I always save branches too, and thanks to your tip I'm going to remember to start picking up greenery on sale. And what a pretty manicure you have -- I can never show those shots with my raggedy, jewelry-making nails :) I'm envious!
ReplyDeletexo, Andrea
They look so expensive! Thanks for the tutorial.
ReplyDeleteYvonne, They look great and how economical! I especially like how you placed one in the blue/white pitcher. You're right- topiaries can be very expensive to buy retail. I recently re-made a three- tiered one that I bought years ago. I just added more moss to beef it up, then I plopped it into a nice vase. Voila- instant greenery. ~ Sue
ReplyDeleteWOW!I love the look of topiaries too! This looks like you had a fun time putting these together, and they look fabulous! Especially with the blue and white china.
ReplyDeleteWELL DONE!
ReplyDeleteThey look wonderful!
I have been looking for greens exactly like that EVERYWHERE- all the hobby craft stores in my metropolis and can't find them. Those are exactly what I was looking for- wish I could- love love love the job you posted!
How lovely!! You did a fab job and I can't believe you just happened to have all the stuff in your house. What a beautiful eye, and it looks fabulous with all of your other lovlies.
ReplyDeletePeople always wonder why I keep anything to do with florals...this is why. I'm always tearing things apart and making new things from them, or buying things that are on sale and saving them for later. The topiaries turned out beautifully. My favorite is the little one in the blue and white...looks perfect with the other things on the hood shelf!
ReplyDeleteGreat job, and genius using the hydrangea branches as stems! Love the pots and adore the topiary in the tini creamer!!!! XO, Pinky
ReplyDeleteGreat idea.. love the look of the ball coming through between the foliage. Something I want to do pretty soon, i have just the spot! thanks so much for sharing, many blessings.
ReplyDeleteI had no idea you could make topiary! This is why I love blogging, I learn so much. They are gorgeous!
ReplyDeleteCarol
Hi Yvonne, It was so nice to see your comment on my blog post today!!! By all means post that saying. It stopped my in my tracks and I like seeing it as a good reminder every day!!! I even did a post on it!!! Love your blue and white with you new topiary!! Kathysue
ReplyDeleteI had a wonderful visit catching up with your sweet blog Yvonne! These topiaries turned out so pretty! And the bread sticks look yummy!!! You always have such a cheerful and beautiful spirit here. Loved my visit.
ReplyDeleteHugs,
Maryjane
Your topiaries turned out great Yvonne! Love that you made them from items you already had on hand! Hope you can make it to the Pillsbury Cook-Along:@)
ReplyDeleteThis is the best tutorial on topiaries I have seen! So bookmarking this as I love topiaries and think they give any room such an elegant touch. I love yours, just beautiful they way they are dispayed with your beautiful blue and white...magazine perfect!
ReplyDeleteYvonne does it again!!! I love them. While you were writing about how expensive they were I was silently saying....make them, make them!! I knew your crafty talents would be able to do something fabulous and you did.
ReplyDeleteYvonne I LOVE them!! Your summer mantel looks beautiful along with the beautiful display on your kitchen hood!! I love all your blue and white pieces. Martina
ReplyDeleteYour topiaries are just gorgeous! I'm like you. I see topiaries in catalogues that are too pricey for my budget. Thanks to your post, I think I could make some. Your blue and white collection with your new topiary on your range hood is just perfect.
ReplyDeleteYvonne, what a great post! It's so wonderful to "find" things to decorate with at home. Your topiaries are fun and beautiful, they really liven up your mantel. Great idea! xo Lidy
ReplyDeleteVery nice, thanks for sharing. How does one make a 'grapvine ball'?
ReplyDeleteJust lovely Yvonne -- thanks for all the steps. Using the furniture touch-up marker was so smart! Love the look and how they add heighth. Joni
ReplyDeleteHi Yvonne! I'm definitely going to be doing this! I have been on the lookout for some new topiaries as well and about fell over at the prices...even at so-called "Discount" stores. Yours look so much more natural and I'm wanting to do a grouping of them at different heights. Guess a run to the craft store is in order for me today! :-)
ReplyDeleteVanessa
How cute is that!! I've been wanting to do something simple on my fireplace mantle and you have inspired me! Thanks :)
ReplyDeleteYou have inspired me to love your new look, and to beg you to please come do your magic on my mantel.♥
ReplyDeleteO' Yvonne, I love your topiaries especially the one in the blue and white picture! Your summer mantel is absolutely gorgeous. I so enjoy my every visit. It's also so full of inspiration.
ReplyDeleteHave a wonderful day,
Gail
Yvonne,
ReplyDeleteI wanted to give you the link to Chelsea's post with the strawberry bread recipe. Thought you would enjoy her fancy parfaits too. Perhaps she wants to be you when she grows up. I wish I were patient enough to enjoy making these fancy things....
http://thefriendsatsunset.blogspot.com/2011/06/strawberry-vanilla-mousse-parfaits.html
Wow so clever of you! I know I've got some old moss balls that are looking a bit bedraggled, now I plan to give them a second life. I recently found your blog, I also love the pies in a jar!
ReplyDeleteKaree
I love that you made these fantastic topiaries! And that you used that furniture pen was brilliant!
ReplyDeleteHugs/blessings,
Lana In Italy
You are so clever! I love to add topiaries to both the garden and the indoors. I usually buy ivy ones, but they aren't always easy to find. Love these with the blue and white. ~ Sarah
ReplyDeleteOlá Yvone! muito bonita a decoração de sua mesa com o tema strawberry. Obrigada por compartilhar conosco como fazer a Topiary! ficou muito bonito.
ReplyDeleteDorath.
http://jaitoutsimplement.blogspot.com/
Stunning post! Loved the summer mantel!..and those topiaries are beauty:) Hope to see you on my blog:)
ReplyDeleteHave a great week!
Sanghamitra.
Oh, these are just beautiful. I need two for my mantel and can't wait to try making them.
ReplyDeleteThanks so much...you are the one that inspired me to make a fall wreath last fall..I love it. You suggested tearing an old one apart for pieces to add to the new..I was able to get a beautiful wreath for very little money. You are so good at this and I've learned a lot from you. :))
xo bj
How pretty Yvonne. You are so clever and talented. They look spectacular in your blue and white.
ReplyDeleteI love the rosemary topiaries that the Barefoot Contessa has on her kitchen counters. Thanks for showing us how to make these jewels.
Sam
Im in love with the rusty containers you used for the topiaries... those are perfect! hope my GW has something like them! :) I AM inspired
ReplyDeleteI love topiaries! These are just beautiful. The ones I have on my mantle are getting pretty dusty and dingy--I may try my hand at this. (Your finished product looks so beautiful and elegant!)
ReplyDeleteWhat a great project! I love to use things I already have in the house to making something new. I love how yours turned out.
ReplyDeleteLove the one in the creamer. Now that's different.
ReplyDelete- The Tablescaper
LOVE them! They turned out great. And of course they are perfect with the blue and white! :)
ReplyDelete~Liz
Loving your lil' topiaries! What a fab idea!
ReplyDeleteThank you for the tutorial. I really like it. I have saved this post to my favourites so I can make it one day. Kylie
ReplyDeleteYvonne, darling it's been aaaaages! :)
ReplyDeleteMissed your beautiful spot!!
Just got drawn back here to see this fab tutorial and your wonderful tablescapes!! Thank you for all the amazing, beautifully inspiring images and posts!!
XOXO
Bird
I love the tutorial! I have also been looking for topiaries and was finding it hard to spend that much money on one. Know I will make my own!
ReplyDeleteI love this idea! I have been looking at the real myrtle topiary's and they are expensive. The artificial ones at pottery barn are as well. I would love to try this and see how they turn out. Thanks for the great tutorial. I am a new follower of your blog. I found you through No Minimalist Here. Your blog lokks think it will have lots of great information.
ReplyDeleteYour home is beautiful. Thanks for the inspiration.
ReplyDeleteHi Yvonne, I just totally relaxed and read a lot. Love your topiaries and I've been busy buying several small ones recently. The best price has been at Ross Dress For Less and Old Time Pottery. I had to laugh about your dreams for your family entry. I know what you mean. Thanks, Helen
ReplyDeleteWow, you make it look so easy! Thanks for the tutorial.
ReplyDeleteYvonne, these are fabulous! I am inspired to make some for my shop~thank you so much! You are on my blog roll too now!! xo
ReplyDeleteThey turned out great and i want to make some just like yours! I've got these linked to my topiaries DIY post too today, nice job!
ReplyDelete