If you take my
menu this week at face value, you
WILL gain 10 pounds by just reading it! I would not usually make so many
rich filling foods in one week. But this is not the average week. Three different groups of
guests are coming! Can we all say "
HOTEL"? I love when my house if filled with people.
And...
StoneGable is hosting a couple of dinner parties! Big,
busy week!
Working ahead is my
trick! My biggest meal is Sunday. No fussy
hors d'oeuvres. Instead, a classy
sassy and packed full of flavor cheese board.
Cheese boards are my favorite go-to appetizer. Yummy!
I can make the
Chicken A La King ahead and reheat it. So I won't be spending lots of time in the kitchen. I'll be
visiting my guests.
I'm going to try not to
over indulge, but have small portions and lots of
salads... I 'll let you know how THAT goes! I hear a
faint voice singing, "Liar, liar pants on fire"!
Monday
Pan Fried Tilapia With A Lemon Wine Reduction
Noodle Casserole
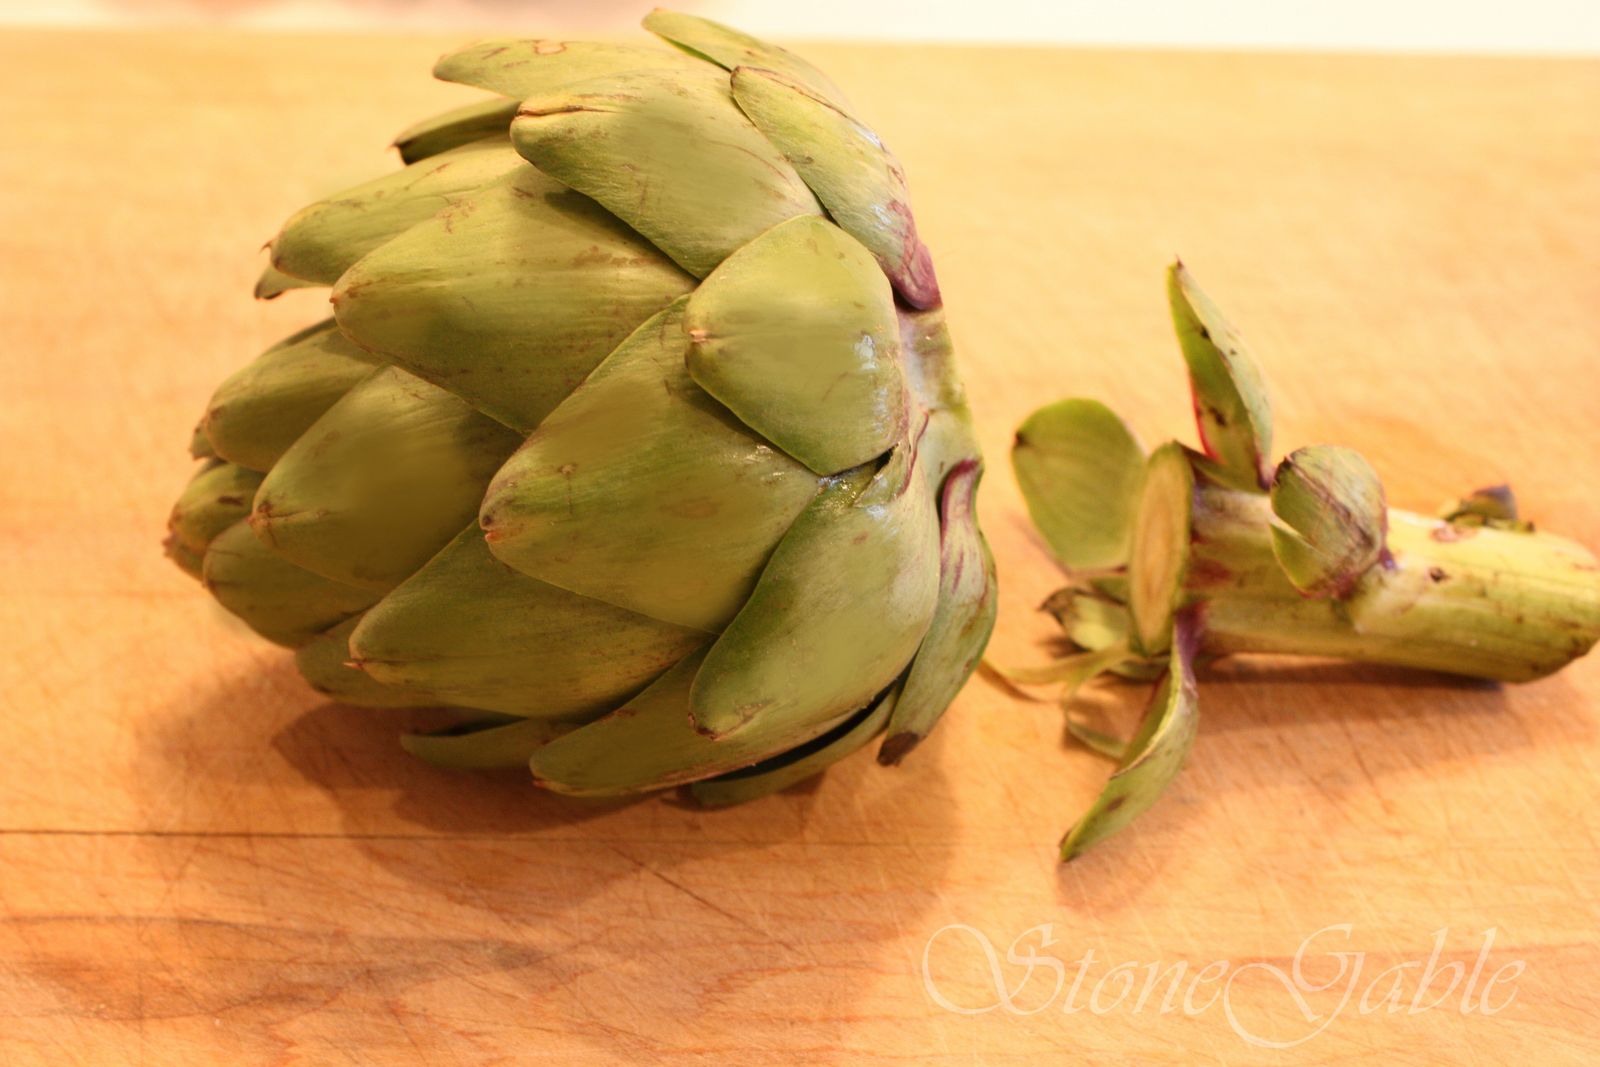
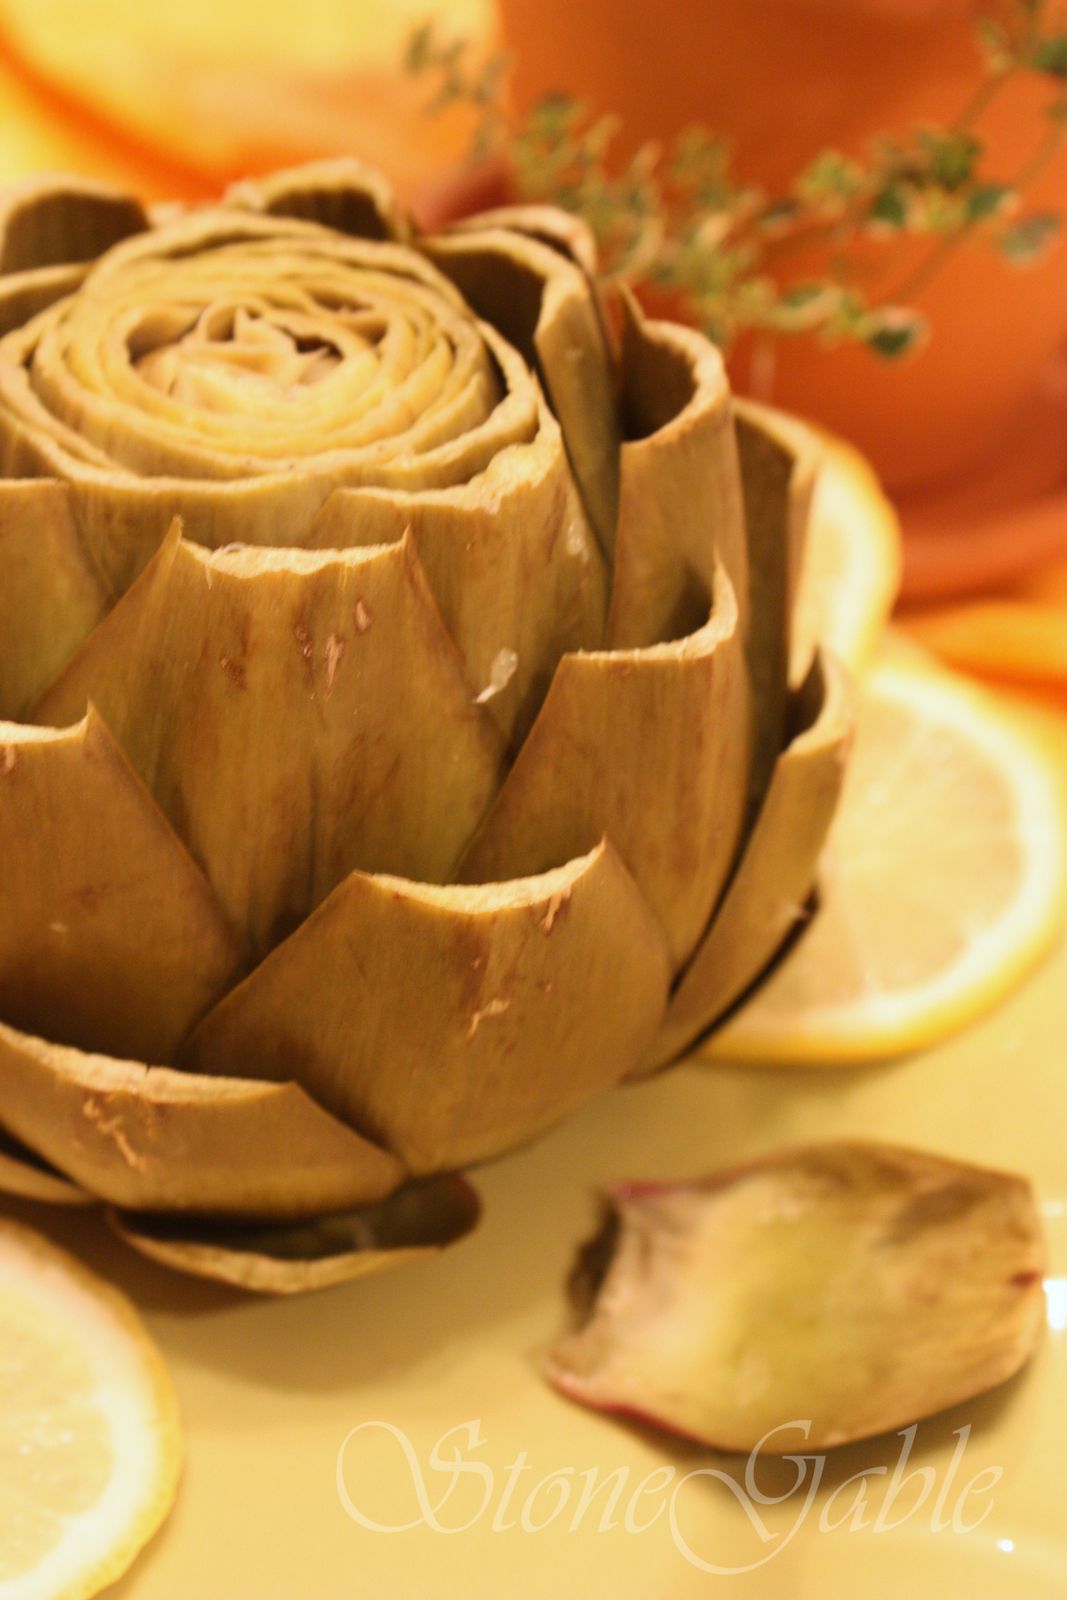
Steamed Artichokes with Lemon Mayonnaise Dipping Sauce
Recipe: Noodle Casserole
This recipe equals love to me! And one of my best blogging buddies, Gail at Faithfulness Farm is the best cook. Her cooking is like a visit to Mom's (if you have a Mom that is a fabulous cook). I know that you will love this wonderful noodle casserole full of Gail's love! Click
HERE for the recipe... and love!
Recipe: Steamed Artichokes with Lemon Mayonnaise Dipping Sauce
Look for a tutorial and recipe for Foodie Friday
Tuesday
Take Out~ Let's Do Chinese!
Wednesday: Slow Cooker Day
Pork Ribs With Molasses Glaze
Baked Potatoes
Roasted Broccoli With Garlic Oil
Recipe: Pork Ribs With Molasses Glaze
1/2 cup dijon mustard
1/2 cup dark molasses
1/3 cup vinegar
1/3 cup packed brown sugar (light or dark)
1-2 tsp hot sauce
pinch of salt
4 pounds pork spareribs, country style ribs or baby back ribs
Combine mustard, molasses, vinegar, brown sugar, hot sauce and salt in a medium saucepan on medium heat. Reduce to low once the mixture has simmered. Simmer for 5 minutes, uncovered. Remove from the heat and let cool to room temperature. I make mine the night before and refrigerate.
Brush both sides of the ribs with sauce. Give each rib 2 or 3 coats. Stack ribs in a slow cooker. Cover and cook on LOW for 8-10 hours until the meat wants to fall off of the bone.
Thursday
StoneGable's Killer Chicken Fajitas
Refried Beans
Mexican Explosion Salad
Recipe: StoneGable's Killer Chicken Fajitas
We LOVE fajitas! I make this recipe with chicken, turkey or flat steak. I have other ways to make fajitas, but this is my very very favorite!!!! This is a must try recipe. Jalapeno pepper jelly is the secret to the wonderful taste!
4 boneless, skinless chicken breasts halves
2 TBS olive oil, divided
2-3 large onions, peeled and cut into thin half moons
2 large red or green peppers, cut into thin strips
pinch of salt
pepper
2 TBS sweet pepper jelly
juice of 1 lime
flour tortillas
refried beans
cheddar cheese (good), grated
sour cream
salsa
diced black olives
I usually grill my chicken but it can be made on the stove top too.
Heat 1 TBS olive oil in a large skillet. Sprinkle chicken with salt and pepper. Add chicken breast and cook for about 7 minutes, flip and cook for 7 more minutes until done but not dry. Set aside to cool.
When cool, cut on the diagonal in slices.
Add the remaining olive oil and heat. Add onions and peppers. Sprinkle with salt. Let cook on medium heat, turning occasionally until onions are slightly golden and peppers are soft.
Add pepper jelly and stir. Add sliced chicken and heat through. Squeeze the juice of a lime over the mixture.
Put a generous amount of fajita mixture on a warm flour tortilla that has a dollop of refried beans spread on it. Sprinkle with grated cheddar cheese and fold in thirds
Add salsa, sour cream and olives over the top of the fajitas.
Recipe: Mexican Explosion Salad
1 bag romaine salad
1/2 cup canned Mexican corn, drained
1/2 cup black beans, rinsed well and drained
1/2 cup sharp cheddar cheese
1 tomato, diced
Mexican ranch dressing, recipe follows
Nachos, crushed
Place salad, corn, beans, cheese and tomato in a salad bowl.
In a small bowl, mix 1/4 bottle of ranch dressing, 2 tsp pkg. taco seasoning, and 2TBS salsa. Mix well.
Dress salad and add crushed nachos.
Friday: Soup Day
StoneGable Minestrone Soup
Parmesan Toasts
Recipe: StoneGable Minestrone Soup
This recipe was adapted from a delicious soup I made from my friend Susan's blog, Savoring Time In The Kitchen. It was fabulous! I just tweaked it a little to suite my family. I have made it twice more. One batch to freeze and one for a friend that needed some culinary love, adapting each batch. It is quickly becoming a favorite. To see Susan's original soup recipe, click
HERE.
3 tablespoons olive oil, divided
1 ~ 1 1/2 lbs ground beef
1 large onion, chopped
3 carrots, peeled and chopped
3 celery stalks, chopped
1 small turnip, peeled and cut into small cubes (If you have never had a turnip in soup, you are missing something! Give this a try)
1 baking potato, peeled and cut into small cubes
2 garlic cloves, minced
1 lb Swiss chard, large stems and center vein removed and leaves coarsely chopped
1 28-oz can crushed tomatoes
2 15-oz cans cannellini beans, drained and rinsed
1 32-oz box good beef stock or broth
1 can double strength beef broth (can of Campbell's)
1 oz piece Parmesan cheese rind
2/3 cup small pasta (I used macaroni because I had it on hand)
2 tsp fresh Italian parsley, chopped
Salt and pepper to taste
Cook pasta according to package directions. Drain and set aside.
Heat 1 TBS oil in a large skillet. Add ground beef and cook until it is no longer brown. Drain fat and set aside.
In a large pot heat remaining oil and add onions, carrots, celery and garlic. Cook until onions are soft, about 10 minutes.
Add swiss chard, turnips and potatoes and cook for 4 minutes. Add crushed tomatoes and simmer until swiss chard begins to break down, about 15 minutes.
Meanwhile, in a blender mix 1 can of drained beans with 1/2 cup of beef stock until chunky smooth. Add the bean mixture and all of the beef stock and double strength beef broth to the soup. Add rind of Parmesan cheese (this is a must, the way it flavors the soup is brilliant!). Simmer for 25 minutes, stirring occasionally until the turnips and potatoes are soft.
Add ground beef, beans, pasta and parsley and simmer until heated through. Remove Parmesan rind. Serve sprinkled with Parmesan cheese.
SG Tip: If you are freezing this soup omit putting in the pasta. Freeze. When you want to use it, thaw, make pasta and add to the soup after you have reheated it. Freezing pasta makes it very mushy.
Recipe: Parmesan Toasts
This recipe is addictive! It is soooooo good. You can use the spread as a dip too. I call it "THE dip".
1 loaf french bread
1/2 cup mayonnaise
1/2 cup sour cream
1 cup Parmesan cheese ( I use the green container shaky cheese kind- no judging!)
1 tsp garlic salt
1 tsp seasoning salt
1 TBS fresh parsley leaves, chopped
Preheat oven to 425 degrees.
Slice bread, horizontally in half
In a bowl mix mayo, sour cream, Parmesan cheese, garlic, seasoning salt and parsley.
Spread mixture on bread and bake for 10-15 minutes until mixture is brown and bubbly and bread is crunchy.
Saturday
Cottage Pie
Peas and Carrots
Recipe: Cottage Pie
A delicious cousin of Shepard's Pie. I am NOT a fan of peas, so I love that the veggies are served on the side. I'll take mine with carrots, please... hold the peas!
2 TBS vegetable oil
1 large yellow onion, finely chopped
1 1/2 lbs. ground beef
1/3 cup flour
1 tsp dried thyme
2 1/2 cups water
1 TBS Kitchen Bouquet
2 beef bouillon cubes
1 TBS Worchestershire sauce
2 1/2 lb potatoes
1/4 cup unsalted butter
2 tsp salt
dash of pepper
dash of nutmeg
1/4 cup heavy cream (I use whole milk)
1 egg yolk
1 cup good grated cheddar cheese
Preheat oven 350 degrees.
Put oil in a large dutch oven and heat on medium heat. Add onions and cook until soft and translucent. Add ground beef and saute until beef is no longer pink. Gradually stir in flour, thyme,water, Kitchen Bouquet, bouillon cubes and Worchestershire sauce.
Simmer for 30-40 minutes until sauce has thickened.
Meanwhile, cook potatoes in a pot of water until done. Drain and mash with butter, salt, nutmeg and heavy cream.
In a 3 quart ovenproof casserole dish put beef mixture. If it has too much gravy,remove some and serve it on the side.
Put potatoes in a pastry bag with a large star tip and pipe potatoes on top of the beef mixture. If you don't have a pastry bag you can add dollops of mashed potatoes to the beef.
Sprinkle with cheddar cheese.
Bake for 20-30 minutes until beef is heated through and mashed potatoes are golden brown.
Sunday: Family Dinner
Cheese Board
Baby Greens With Bleu, Pears And Spiced Pecans In A Poppyseed Dressing
Chicken A La King In Puffed Pastry Cups
Green Beans
Gingerbread With Creme Anglaise
Recipe: Cheese Board
I LOVE to serve a great cheese board when entertaining. There is really nothing to make, it is just about putting together some fabulous cheeses, meats, and lots of other goodies. My family will be delighted with a cheese board filled with everyone's favorites!
Food to Include in a Cheese Board:
1 hard cheese
1 semi soft cheese
1 spreadable cheese
1 strong cheese
meats, such as sopressata or salami. I also like prosciutto
fruits, grapes, apples, pears, cherries, dried fruit
marinated or grilled veggies
nuts
tampanades
olives
great mustards
bread sticks, baguettes, crackers
Recipe: Chicken A La King In Puffed Pastry Cups
Look for the recipe and how-to's on an upcoming Foodie Friday.