Thanks to Susan at Between Naps On The Porch for hosting Metamorphosis Monday… I am so inspired with all the creative and inventive Metamorphosis! After you see mine, go give them a look. You will be inspired too.
The mums were potted, the wreath was hung. Pumpkins were scattered in a pumpkin patch manner around the porch. This year I did forgo the corn stalks and hay bales- they are messy and I wanted a more tailored look… at least for this year. But my wreath was looking very tired. This was its 5th fall hanging on the front door. So, today I decided that it was time to give it a Metamorphosis treatment. Down it came. All of the tired elements on it were taken off.

This wreath has been used for many, many years. It was an investment purchase. And well worth it!!!!. I have repurposed it more than a couple of times.
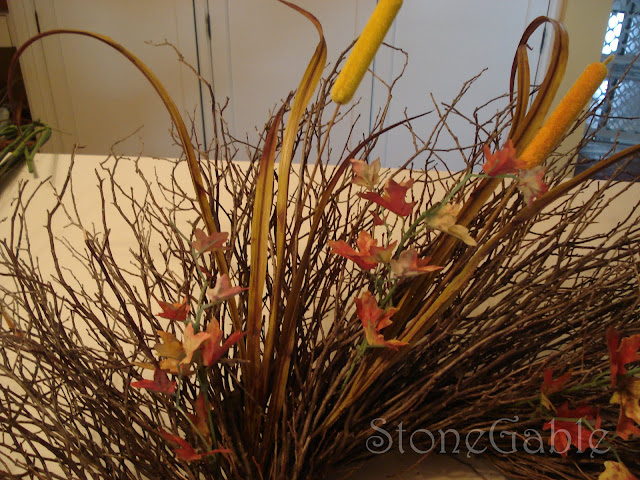
I wanted a lush and full wreath. A real eye-popper, without being fussy or confusing. I wanted the colors to "play nicely together". Calm and soft in color and tone. The inspiration was a large burnt orange flower and some cattails my Mother gave me ( She did not know what to do with them). I used “sticks and twigs” I already had.
 I found a box of shiny, muted fruit- half price so I picked that up too.
I tend to like a “C” shaped arrangement on my wreaths so that is how I started. I put in the base “filler”- some small oak type leaves.

Next, the cattail were used to make the parameters for the arrangement on the wreath. They are like the frame. They dictate the top limit.

And the bottom limit.
 The big inspiration flower is cut. I keep the stem long so I can really plunge it into the wreath and then I go crazy with the hot glue gun. I want it to STICK!
 I bend the base of the flower at a 90 degree angle so it is facing front when I put it on my wreath. Positioning each element is very important. Every detail needs special attention.
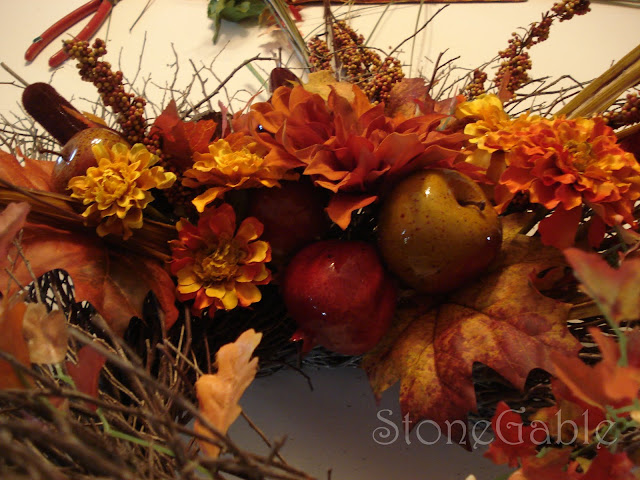
 From there fruit is added and some beautiful silk marigolds.
It is important to add each element, no matter how small, individually. Placing them just where you want them makes the wreath more professional.

special attention was paid to the inside edge of the wreath. The arrangement should spill over onto it also. It would look unfinished if left bare.
 work from the center out. Building and adding and layering elements. The fruit I thought would be very noticeable became the base for more fruit. It plays a supporting role to other fruit, leaves and berries. That is what makes it look so lush. I learned this from watching professionals at an upscale shop I love ( but I don’t love the prices!!!) Always keep your eyes open, I have learned so much by just watching. (By the way, it cost less than $15.00 to make this wreath, and I have enough "left overs" to make another...yeah!!!!)
  Keep adding layers, more leaves, “filler” and flowers until it was very full but hopefully not distracting.


Yvonne, that is an absolutely great looking wreath! I love the stickiness (is that a word???) of it. Just perfect, and I like what you added to it.
ReplyDeleteHappy Met Monday!
XO,
Sheila :-)
Yvonne! I love the way that this turned out! I am never good with these things. Recently I waxed leaves I picked up during a fall walk, and that was easy ... and fun, but then arranging them on the wreath form ... send in the clowns! LOL! You did a fantastic job!! I could def. learn from you!
ReplyDeleteThat turned out beautifully Yvonne! Wreathes like that can be an investment but SO beautiful!!
ReplyDeleteYvonne,
ReplyDeleteFirst of all thanks for visting my blog and following. Your wreath is just beautiful. I love making wreaths and I want to try one of these for the inside of my home. Thanks for the inspiration! Can you tell me what program and how you mark all your photos with your name on them. I have wanted to start doing this to my posts. Looking forward to talking to you soon. Blessings...Sherry
The wreath looks great! Beautifully done. I hope you will join me at The Persimmon Perch for Made it Mondays. Mister Linky is up and ready for you to enter.
ReplyDeleteIt looks beautiful, you have a good eye for floral arranging. I redo mine often for the front of the house. I can't always do exactly what I want because mine isn't protected and takes direct sun, wind and rain...it makes it very tricky to come up with something that is both pretty and will make it through the season.
ReplyDeleteSue
This is a gorgeous wreath!! Every detail is perfect. Well done.
ReplyDeleteHappy Met Monday!
http://www.mooreminutes.com/2009/10/walls-wrapped-in-charm.html
You are a talented lady and the wreath is beautiful.
ReplyDeleteI'm drooling, that is so beautiful. I think it would look much better with the ribbon and hanging a tad lower, but still, it's breaktaking just the way it is. Thanks for the How-to's.
ReplyDeleteLovely wreath, lovely door, LOVE the pineapple!!!!
ReplyDelete:)
ButterYum
I like your door wreath, specially the arrangement and the colors of the flowers, it blend so well. What kind of artificial flowers you use on this one?
ReplyDeleteYvonne, this is absolutely STUNNING! I LOVE it! LOVE IT! Can't wait to see what else you do...I will be back ;)
ReplyDeleteLou Cinda
Love this blog, and the wreath is adorable! Featured it on our blog post :) http://epochbydesign.com/blog/diy-holiday-wreaths/
ReplyDeleteThis wreath is not just beautiful but is elegant and classy. What a great talent you have. Thank you for sharing
ReplyDeleteThis is the right blog for anyone who wants to find out about this topic. You realize so much its almost hard to argue with you (not that I actually would want…HaHa). You definitely put a new spin on a topic thats been written about for years. Great stuff, just great!
ReplyDeleteI completely agree with you. I really like this article. It contains a lot of useful information. I can set up my new idea from this post. It gives in depth information. Thanks for this valuable information.
ReplyDelete