

I've caught the "Painted Furniture" bug in a big way! It started with a little round side table and now there is almost no piece of furniture safe from my paintbrush!
I find myself eyeing up pieces and dreaming about the color I would like to paint them! I have even taken to collecting furniture that I'll someday paint!
The little white dresser that lives in the Gable Guest Room went through a recent paint transformation... here's my painting technique...

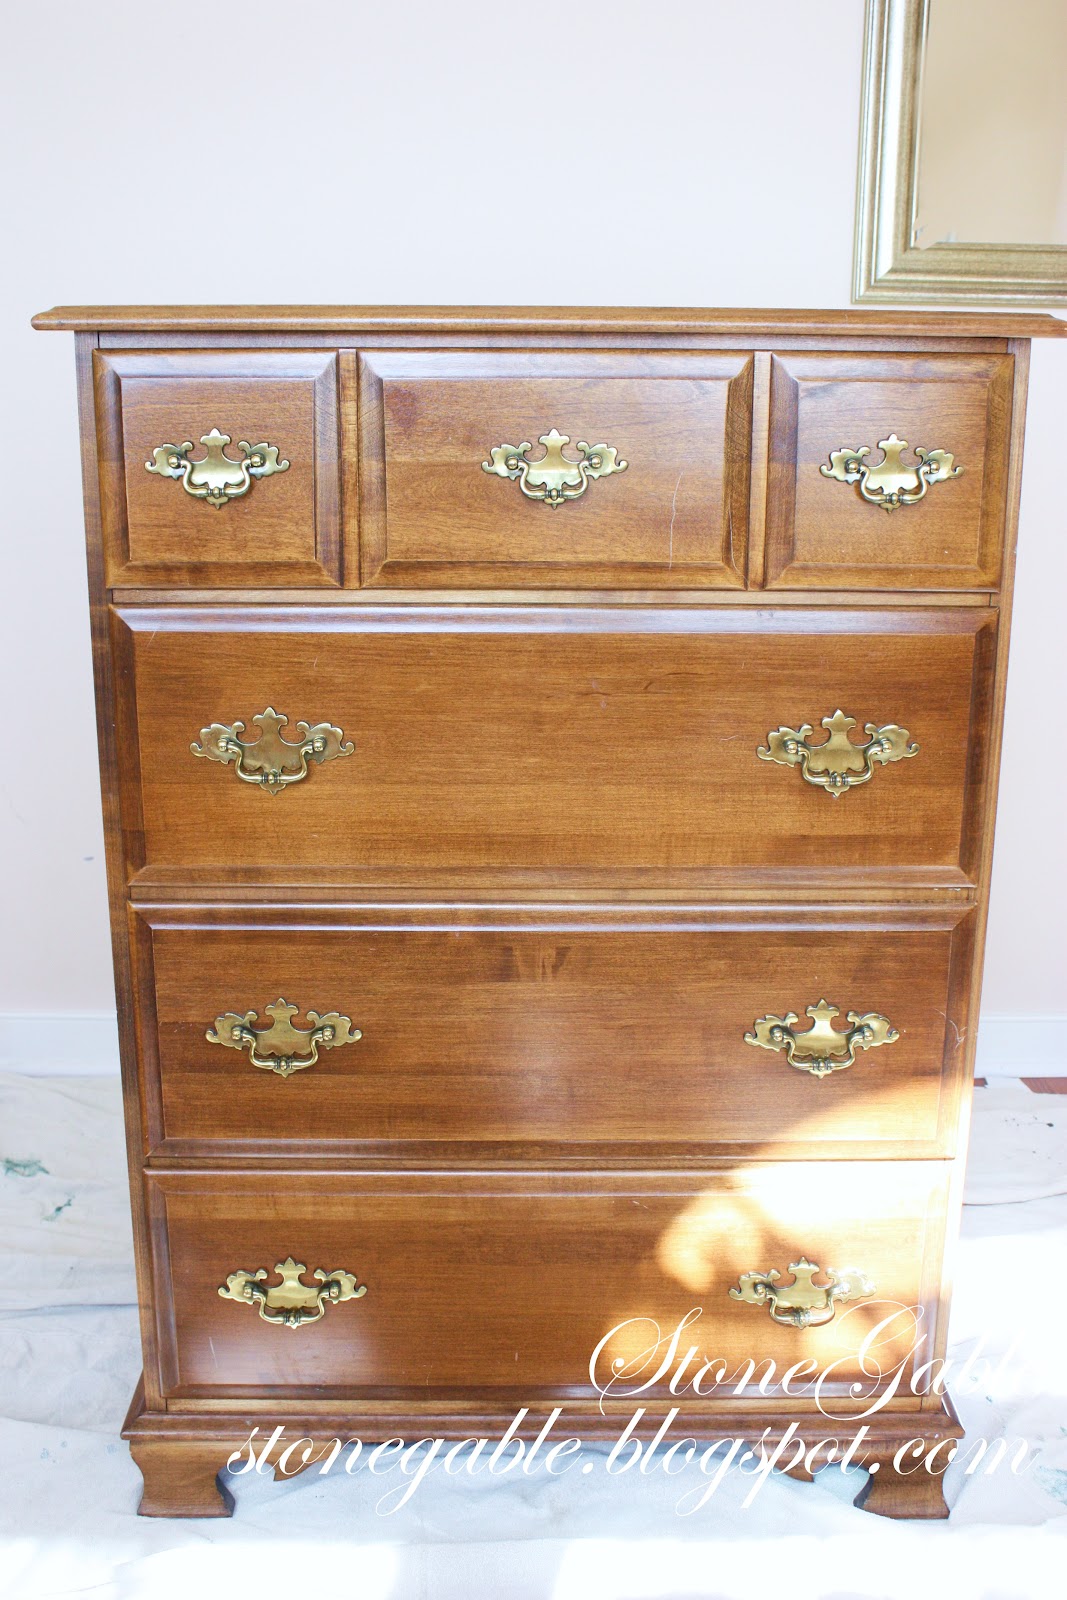
The Before...
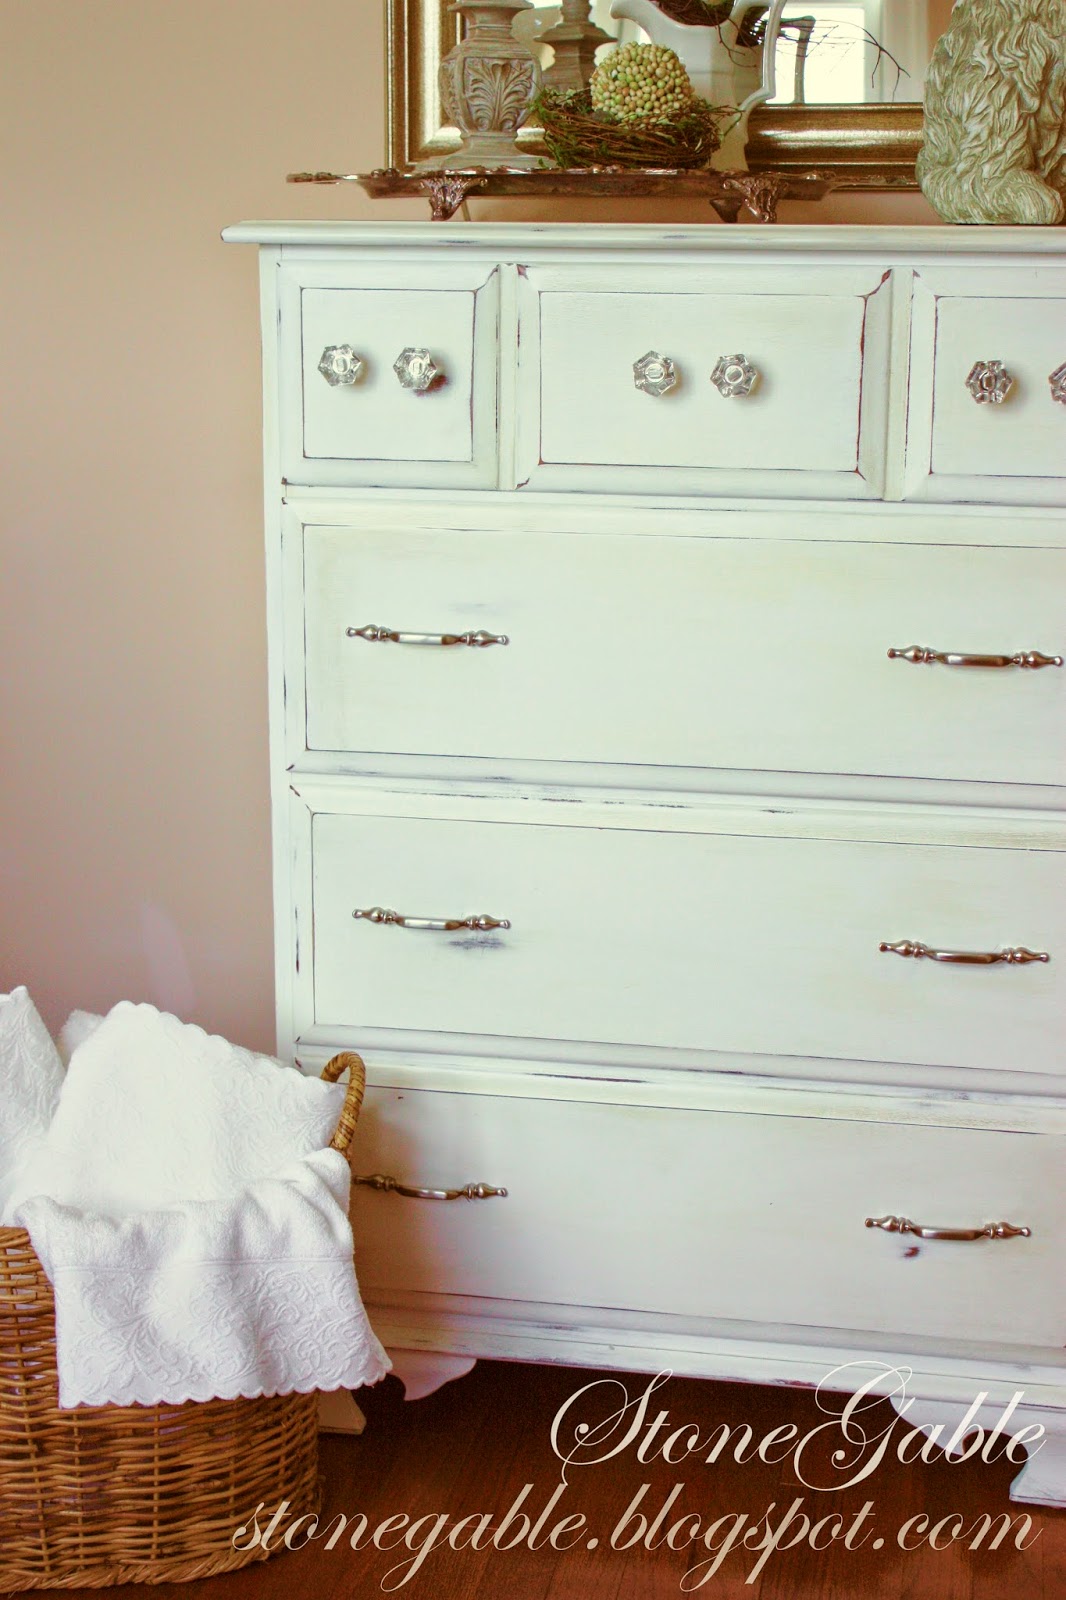
The After...

My Painting Philosophy...
Disclaimer: I have had no formal furniture painting training, no classes, not a whole lot of reading in the area of painting furniture, etc. I am developing a technique as I paint each new piece. And each new piece brings a deeper understanding of the art of furniture painting!
No two people would paint a piece of furniture the same, even if they were given the same materials. It is an individual creative expression. Embrace your own style!
Here's what I like... a somewhat smooth finish, subtle variegation of color, warmth, gentle wearing, waxing to a soft glow and painting a piece like it will someday be a work of art.
Here's what I don't like...sanding off old finishes, chipping off veneer, paint that looks thick on a piece, gloppy paint, lots of different colors all over a piece, a mat finish, a piece that looks like it has been thrown down cement steps a hundred times (too scratched, dented and sanded) and a piece that has been slapped with 2 coats of paint and called finished.
Painting is a process... layer upon layer until the final product. The first coat of paint is only the beginning. It looks nothing like the beauty a properly painted piece will become! I think many people stop painting a piece before it is really done. Light layers... layers after layers... give a piece of painted furniture it's beauty from within!
I know this sound a little but silly... but you have to let the piece speak to you. When I am painting something I feel like I am giving it new life!
Paint Of Choice...

Like many people in blogland, I LOVE Annie Sloan Chalk Paints! But, it was NOT love at first sight for me! I just could not understand what all the fuss was about! These new chalk paints intimidated me! I had never used chalk paints. I thought they were very pricey, their colors were limited, chalk painted furniture looked dull and lifeless and I found very few detailed tutorials to show me HOW to use them.
Oh was I wrong... these paints are wonderful to work with!
I use many other paints, stains, glazes and waxes, but ASCP are my favorite.
Click HERE for a list of American Annie Sloan Chalk Paint Stockists.
PAINTING TECHNIQUES
Materials
Annie Sloan Chalk Paints
Valspar Paint
Annie Sloan Clear Wax
Annie Sloan Dark Wax
drop cloth
latex gloves
soft white clothes~ like T-shirts
very fine grade sandpaper
vacuum
The Beginning...
The first thing I did was wash down this dresser getting off any dirt and let it dry thoroughly. I placed the dresser on a large drop cloth. I pulled the drawers out of the base and painted it all seperately. I chose not to paint or use the original hardware, so I removed it.
I gave the dresser one coat of "Pure White" ASCP. It is important not to apply it too thickly. It may not completely cover on the first coat and that is okay.
I let it dry. This was the hard part.
I sanded the first coat lightly. I used very fine sand paper... not overly vigorous. I just wanted to rub down any drips, paint brush strokes and uneven areas. I really liked this sanding process. the paint sands off like... well, chalk dust! When you do this you do not want to rub down the corners and edges yet. This sanding process is to give the piece a somewhat smooth finish.
I kept a vacuum handy to get up any chalk dust. This REALLY helped!
I then wiped my piece down with a just barely damp cotton cloth and let it dry.
The Middle...
I applied a second coat of AS Pure White paint. Before it dried I painted some small areas with AS Old White Paint, lightly blending it into the Pure White. This is an artistic, judgement call. It's very subtle. Don't be afraid of this step, because you can always paint over it or sand it off if you don't care for it.

The paint was left to dry completely.

When all was dry, I used a very fine grade sand paper and started sanding out the roughness of the paint. This was so much fun! Chalk dust was flying!!!! I sanded off the paint to expose the wood on some of the edges of the dresser. I also sanded here and there on my piece taking the paint off to make it look worn.
Sanding is a matter of personal style and preference. Some like very worn looking painted furniture, some like no wear. I am somewhere in between. It all depends on the piece, the decor around your piece, you style and what says "beautiful" to you.
Just something to think about... I tried to imagine people using this little dresser over the years... where their hand would touch, where things might have been placed on top of the dresser, what drawers they might have used the most, where it would most likely have been bumped or banged. And it was those places I sanded more to look worn.
Vacuum. vacuum. vacuum!
I wiped down each piece with a soft cotton cloth that was just barely damp and let it completely dry.

After I sanded, I rubbed my hand over the dresser and made sure that there were no "rough" areas. Chalk paint has a tendency to feel... chalky! Sorta rough... but once sanded it has a beautiful feel.
Here is the balance... I want my dresser to feel smooth, but I also don't want to sand away all the brush strokes or areas of character. This is the part of painting I just love... listening to the piece! It's so beautifully artistic to me. So individual.

I took a really good look at the dresser. I decided to add just a sightly different color value to the piece.
I rubbed a little blob of Valspar "Oatlands Subtle Taupe" on the bottom of each drawer with my finger. I find dipping my finger into the pain and rubbing it where I want some variation in color works wonderfully. I'm literally a hands on kind of gal!
There is really no rules I follow for adding other paint colors, just keep it subtle and keep it interesting.

The paint went on so smoothly that I did not need to sand it.
Here are the drawers all painted and sanded.

Finishing Strong...
After the dresser was completely dry I used Annie Sloan clear wax to give it a soft glow.

I applied just a tiny bit of wax to a small area with a soft cotton cloth ( I have since bought a horsehair waxing brush by Annie Sloan). Just a little dab will do!
I let it dry and buffed it with a clean white cotton cloth. Break a sweat when you buff!
Then I moved on to the next area until the entire dresser was waxed and buffed.
Dark waxing was the last step! I used dark wax to add a depth and a well worn look to corners, indents and parts of the dresser. Doing this well will bring a piece to life!
Here is where I was very careful. The dark wax is wonderful, but it really "grabs". What goes on does not all come off.
Starting in a small area that I wanted to make darker, I applied CLEAR wax with a soft cloth ( or horsehair brush). Then, WHILE THE CLEAR WAX WAS STILL WORKABLE AND NOT DRIED (working quickly), I applied a very very small amount of dark wax with a horsehair brush (you could use a soft cloth if you don't have a brush), rubbing it into the dresser. Almost immediately I removed as much of the wax as I could with another clean cloth. You can always add more dark wax... you cannot remove it.
Then I buffed, buffed, buffed to a soft glow.
These photos do a good job showing you the nuisances of the dark wax.

I then added some pretty glass knobs and ...

simple silver pulls to the dresser.

I think they give the dresser a charming look.
Remember to


I love your dresser! Thank you for the tut too!
ReplyDeleteBTW...thought you would like this...a friend of mine loved one of your wreaths so much she made one! Check out my Tuesday Toots! Hugs and blessings, Cindy
Hello Yvonne, I am with you - painting is definitely a personal form of expression - you do exactly what I'd do. Absolutely LOVE the outcome! I have an old wardrobe I have left to paint...thinking I need to get to it today! Thank you for sharing ...got to love that chalk paint!
ReplyDeleteHope you have a great week,
Kathy
Great job Yvonne! Isn't AS chalk paint the best!! I can't wait to see the rest of the room!
ReplyDeleteBeautifully done Yvonne. ASCP are really unique - have you tried Antoinette? The most subtle shade of pink... Planning some ASCP themed tours in France now, will let you know all the details.
ReplyDeleteEnjoy your new piece.
Mimi
Thanks for all the tips, Yvonne. I have used ASCP on a couple of pieces but have not been doing much furniture finishing lately. I do like the way it sands off...so easy...and, like you, I don't want a pristine looking piece nor do I want one that looks like it was pitched out of some hovel. I think there is a fine balance there. Your dresser turned out great. You are right about that dark wax...a little goes a LONG way! Can't wait to see your new PINK chair. xo Diana
ReplyDeleteThis is just the perfect little dresser for a guest room~love it!
ReplyDeleteThank you so much for this helpful post. You have more info here than some sites I have researched! I saved this so I can refer back. I want to paint my guest bedroom furniture, quite honestly, I am scared to death. I have to paint in the room, no way I can get it down to my backyard and back up. I have to pray on this and hopefully I can get it done. It would be some achievement for me. xo
ReplyDeleteThank you for this very helpful tutorial Yvonne. I am keeping it for future reference. Once, early in our marriage, I painted a couple of tables white and they looked like a kindergardener painted them. So obviously I need all the help I can get. Again, thank you.
ReplyDeleteSam
Thanks so much for these tips. I'm probably one of the very few who hasn't painted with ASCP yet. I'll be bookmarking this page when I finally get around to painting something. You've done a fine job on your dresser. So pretty!
ReplyDeleteThis is so beautiful and I think you should do a Youtube video on the process as well. Although your instructions are very clear. I just love watching the process! Thank you for sharing!
ReplyDeleteIt looks beautiful and the pulls are perfect with the finish, job well done!
ReplyDeleteI have AS Old White and both clear and dark waxes, and the horsehair wax brush and even a nice horsehair brush I bought fromt he vendor - and am working up the nerve to try and paint.
ReplyDeleteIt sits there beckoning me and I have been trying to find the time, energy and nerve to jump in.
Your tutorial helps a LOT!
Thank you so much!
I love that dresser, cannot even believe it is the same one as the before pic. Just wows me.
You have given me the courage to try this. And I just found a source of Annie Sloan paint in a really cool shop in Chicago.
ReplyDeleteWonderful tutorial. I use ASCP, too, but haven't ever layered traditional paint on top. I like the double knobs on the drawers.
ReplyDeleteI love how the dresser turned out, exactley how I'd like my furniture to look when I paint it! I loved the tutorial and my next painted piece of furniture I'll be using this method or trying to.:)
ReplyDeleteClassy and style and elegance......Yvonne you are amazing:)
ReplyDeleteBeautiful transformation Yvonne! Isn't it amazing what a can of ASCP can do.
ReplyDeleteYou have inspired me again, Yvonne! All we need to do is have a little vision and see beyond the obvious to the potential!
ReplyDeleteI love all the details that went into making the dresser fabulous!
ReplyDeleteDee
I am so appreciative of the detailed post on this subject, as I am currently intimidated by this process. There is a piece of old furniture (not grand, just old) in our summer home that is begging for this type of attention. So, with your help in this post, maybe I'll tackle it this summer!
ReplyDeleteThank you again for this and all your magnificent posts!
Nancy
It is so good of you to do this detailed tut! I doubt I will be painting any furniture BUT if and when I do THIS is where I will come for help:):) XO, Pinky
ReplyDeleteThis is a fabulous piece! Truly an amazing transformation! Thanks for all of the tips on ASCP; I love it too! It is an amazing product! I'm bitten bu the painting bug!
ReplyDeletethanks for the fabulous tutorial. I have always wanted to try this but am afraid I'd make a mess of it. Will have to look for an interesting little side table to begin! Your dresser's transformation is amazing....love it!
ReplyDeleteCarla
Yvonne, You did a beautiful job painting and waxing this dresser. You give the most concise tutorials as well!! Very beautiful end result! I can not wait to see how that pretty Lucketts chair comes out! :-)
ReplyDeletexo-Lisa
The dresser is beautiful.
ReplyDeleteSharon @ mrs. hines class
The dresser is beautiful.
ReplyDeleteSharon @ mrs. hines class
I just finished an old late 1800's "slider"...a table that slides out to seat 12...however when I bought it many, many years ago, the top was heavily scratched with cigarette burns...it was a very beautiful table and the price was right..so for many years I had a dresser scarf/battenburg lace piece over it...now, it has new life..I love using the ASCP...it is so forgiving and a joy to work with...
ReplyDeleteLoved your tutorial...I know what you mean about the vacuum!
I just met Annie Sloan and I also use ASCP. She says to use the clear wax before sanding and you won't have as much dusting. Also if you apply the dark wax just after the clear you won't have as much staining. You can also mix the waxes for a lighter staining as well as mixing them with a little paint. This was a great before and after a great tutorial--expecially for someone not having taken any classes:) great job!
ReplyDeleteThis is really great info! Thanks!!!!
DeleteCan't wait to see the chair!!!
ReplyDeleteThanks for the step-by-setp. It is going to be helpful for me.
ReplyDeleteThe dresser looks great and you did a really good job.
Cynthia
I forgot to mention I am now following via email.
ReplyDeleteHi -really beautiful job on your piece. I am an Annie Sloan Stockist in Florida. A couple of tips to even get a better result with the paint. Annie recommends distressing after the first coat of wax, so that you don't get so much dust. 220 grit sandpaper or higher works best with the paint. And you can use the Clear Wax to wipe back the intensity of the Dark Wax. The Clear Wax acts a magic eraser for the Dark Wax. I encourage you and your readers to take a workshop from one of the Annie Sloan Trained Instructors. There are so many tricks and tips that we give you for making the most of the products in our workshops. Thanks for sharing your experience with the Annie Sloan brand. We are all so proud to be representing this product. Your blog is so lovely. I plan to be a regular follower.
ReplyDeleteLisa, What great info! If workshop ever comes close to where I live I will be there! I will use these little tips! Thanks!!!!!! I love people who share!!!!
DeleteYvonne
I really enjoyed reading your thoughts and processes with ASCP as I've only used it a couple of times, but really like it too.
ReplyDeleteYour dresser looks great and I love the new hardware.
Thanks Fiona
this is absolutely beautiful...I am pinning now!
ReplyDeleteI really appreciating your idea's..keep it up......
ReplyDeleteThanks for posting such great instructions! Can't wait to try this on my dresser and chest-of-drawers!
ReplyDelete