

Aprons are beautiful things. They save our clothes from getting dirty. Gather the corners up and they work as impromptu baskets for gathering flowers, fruit and vegetables. Their strings can act as an extra and secure hand a little one can hold on to. They are often a stand-in for towel or pot holders. And in a pinch they can even wipe away tears.
Here at StoneGable aprons are daily attire . I have kitchen aprons and garden aprons and company's coming aprons. Sometimes I even forget to take them off until I get ready for bed!
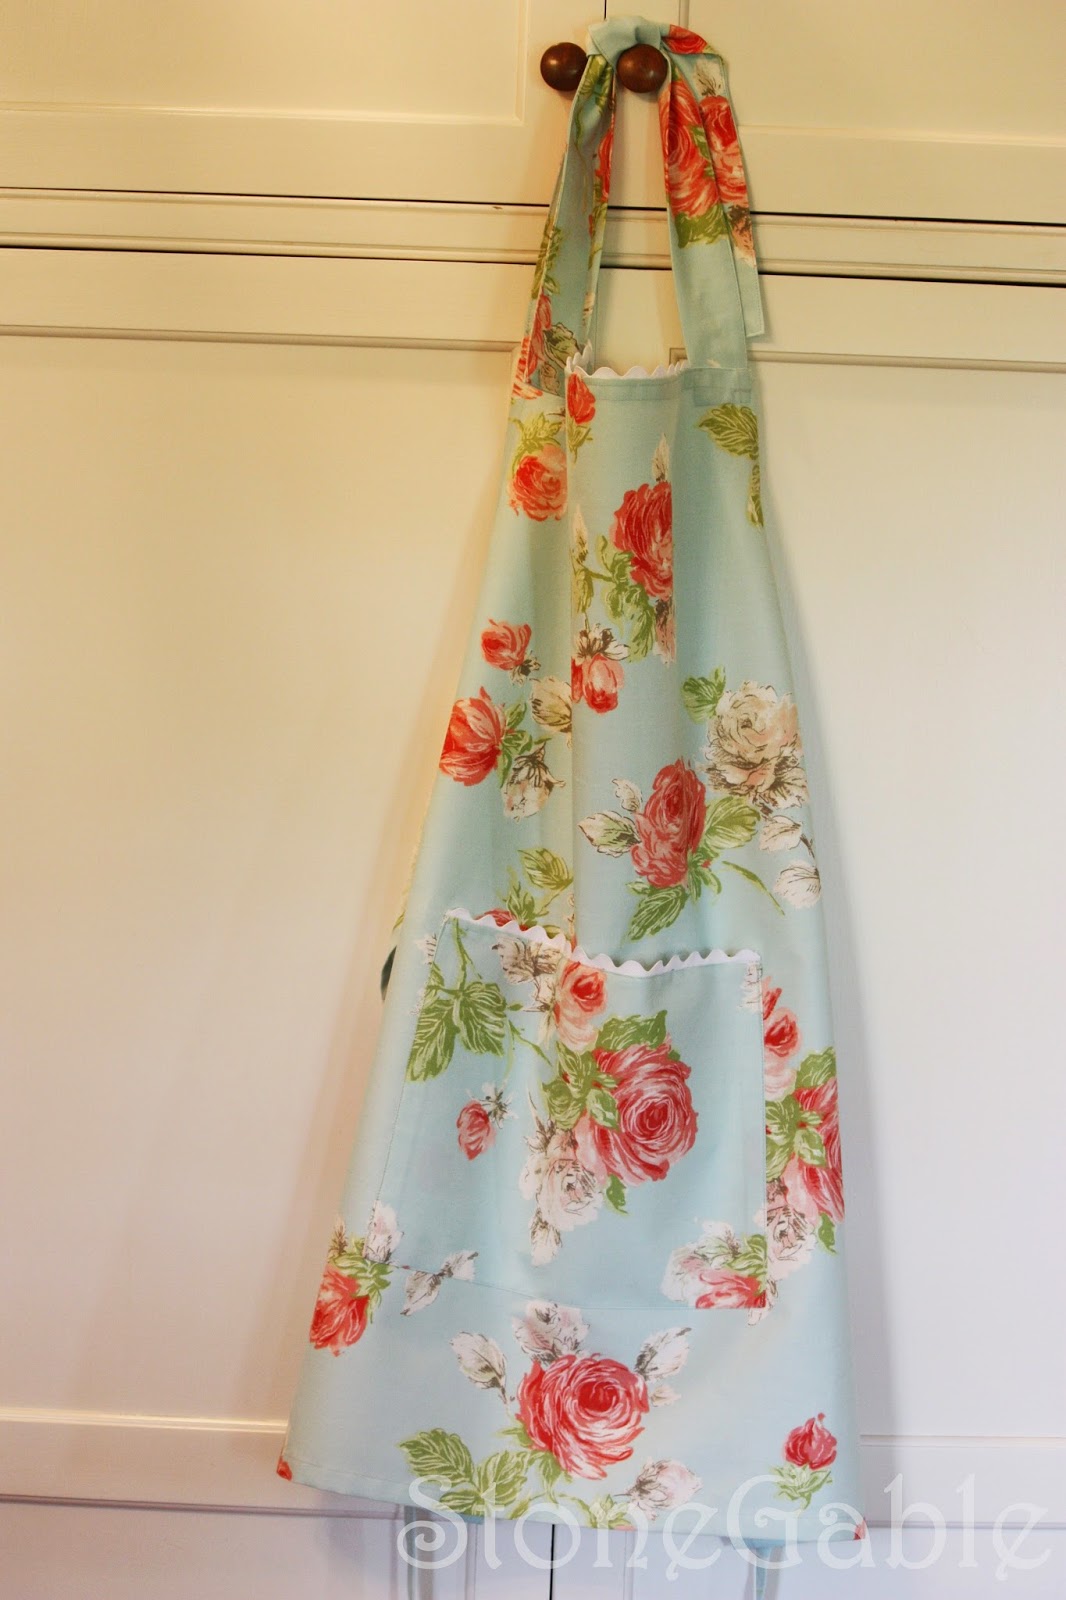
So when I spotted this beautiful feminine vintage feeling material I just knew I had found my newest apron...

I am particularly smitten with the color combination. Soft dreamy aqua and coral pinks. The rose motif has a bygone-days feel.
This will start out as a company's coming apron and if it is very lucky, after years and years will end up as a garden apron.
If you like to wear aprons, making them yourself can be very satisfying!
I have kept this apron's styling very simple and tried to give detailed instructions. You can make this apron in a couple of hours. It is really quite easy and would be a great beginner project. I hope you will soon be wearing your own homemade apron!
StoneGable's Apron Tutorial
1 yard heavy, apron worthy material (mine was on sale at Calico Corner's- decorator fabric)
matching thread
ric rac
large paper grocery bag
colored pencils
ruler
old bib style apron (as template)
Wash and dry fabric.Press. This is an important step~ do not skip it!
Cut a paper grocery bag to open it up. Iron to take out wrinkles. This will become your pattern.
Iron your old apron. Fold it in half vertically as pictured and place on the brown paper.

Carefully trace the apron onto the brown paper. I used a white colored pencil.

Using a ruler, add 1 inch to the pattern.

Cut out the pattern on the red line.

Fold fabric lengthwise as shown. Put pattern on material matching the center edge of the pattern with the FOLD of the fabric. See picture.

Pin pattern to fabric. Pin, pin,pin!

Cut out apron on the outside edge of the pattern. Remove pins.

Begin by sewing apron SIDES first. Clip cures on each side of apron just under 1/2 inch. Doing this will help curved seams lay flat and not bunch when sewing.

Fold under 1/2 inch seam allowance and press. Do this for each side of the apron.

Fold seam over again 1/2 inch. Press and pin.
Sew seam close to the inside edge of the seam allowance.

Sew both SIDES of the apron.

Sew the BOTTOM of the apron. Turn 1/2 inch seam allowance and turn over another 1/2 inch like pictures above. Press. Pin. Sew close to the inside edge of the seam allowance, as pictured above.
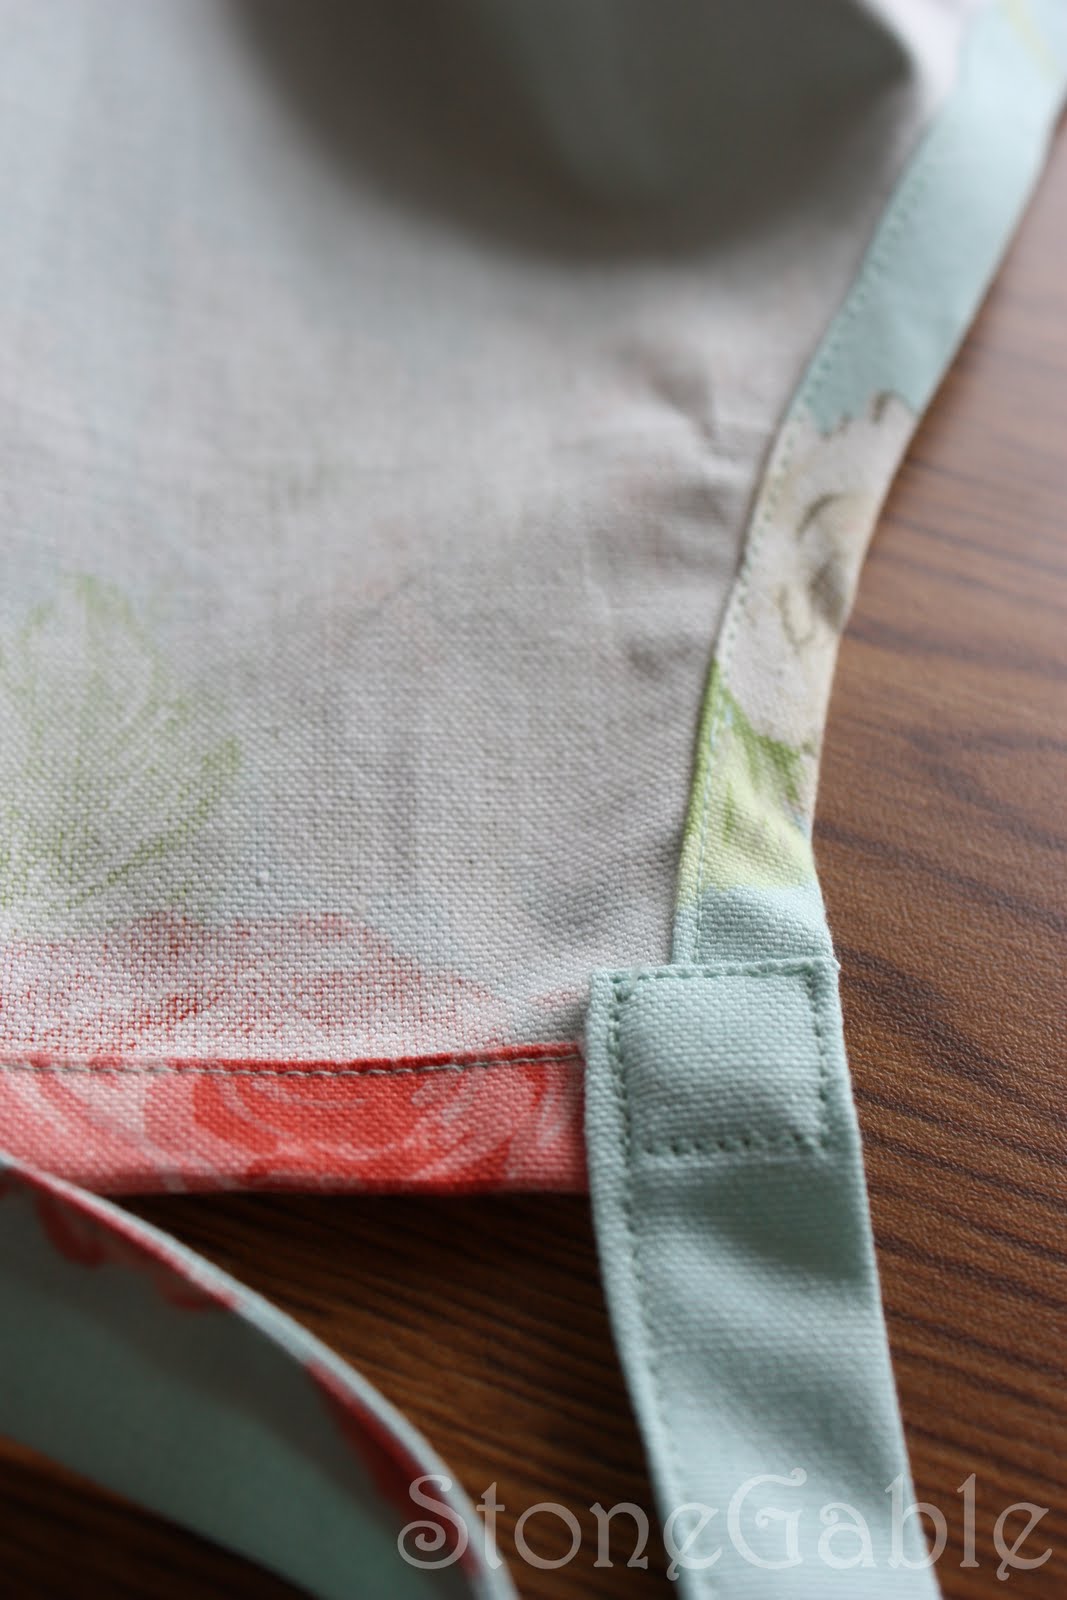
Sew the TOP of the apron in the same way.

To make the apron ties, cut 2 - 30" x 3" pieces of fabric.

On both sides of the length of the tie, turn 1/4 inch seam allowances to the wrong side of the fabric and press.

Fold in half lengthwise and sew all three open edges close to the edge. Sew the second apron string the same way.

Cut 2- 4 1/2 x 30 inch pieces of fabric. These will be the neck straps.
Sew 2 neck straps using the same technique that was used to make the apron strings.
Sew apron string and neck scraps to apron body. I stitch a box pattern to secure the strings. See pictures below.


Cut a rectangle out of the material for a pocket. If your fabric has a design, make sure to center the design on the pocket. I made this pocket 18" x 22".

Fold 1/2 inch seam allowances on the SIDES of the pocket. Fold another 1/2 inch amd press. Sew sides.

Fold the BOTTOM and the TOP of the pocket the same as the sides. Press and sew.
Add ric rac to the TOP of the pocket by sewing it to the WRONG side of the pocket.

The peaks of the ric rac should stick up from behind the TOP of the pocket when RIGHT side is facing you.


Fold pocket in half vertically and press. Fold apron in half vertically and press.
To position pocket, line up folds. I placed my pocket 6 inches from the bottom of my apron. Pin, pin, pin.
Sew the SIDES and BOTTOM of the pocket to the apron.

Sew ric rac to the TOP of the apron using the same technique as the pocket.
Press and enjoy!


Remember to


You're right! I LOVE it...such pretty fabric and thanks for showing me how to sew! I make it up as I go and I don't do thing s the right way...I like your right way! Very pretty! :D
ReplyDeleteI just bought a new apron today at Anthropogie! I love them too! I adore the new one you made! The fabric is gorgeous! I wish I had your sewing skills...mine are sadly lacking!
ReplyDeleteEnjoy!
Cathy
Hi Yvonne...
ReplyDeleteOhhh...if this isn't the prettiest apron ever! I just adore the vintage looking fabric you chose...sooo very sweet! I totally agree...there is just something about that soft aqua color mixed with those beautiful coral colored roses! You did a fabulous job with the tutorial too...thank you so much! As always, your photos are stunning!!!
Well my friend, I have been so busy lately but I have had a few moments where I was able to sneak a little blog time in. I came by and took a peek at the last couple of tablescapes that you did! Ohhh my...they were FABULOUS!!! I didn't get a chance to comment at the time but just had to say something to you about them! Yvonne, you are such a creative and talented lady!!!
Have a wonderful weekend, my friend!
Chari @Happy To Design
The fabric is fabulous! And thank you for such a clear and concise tutorial. My sewing machine spot is on a table right beside my computer. How convenient is that for following your step-by-step instructions? I know you'll be entertaining beautifully while wearing that apron.
ReplyDeleteBest,
Bonnie
Beautiful fabric! I make aprons too, my favorite so far is a pig fabric with a 3" white ruffle on the bottom, and a couple yo-yo's for embellishment, I call it "The Farmer's Daughter". It's fun to sew-great tutorial. Have a great weekend!
ReplyDeleteIt is so nice to find someone else that wears aprons. I too have an everyday one bought at a country store and a very feminine one with lots of lace for when we have company. Gardening ones are heavy material with big pockets.
ReplyDeleteI don't sew so have to buy my aprons but your instructions look simple to follow - maybe my granddaughter who is starting to sew could make me one.
The material you chose for your new apron is quite pretty.
Beautiful apron!! Such detailed instructions and great pictures to go along. Thanks for sharing, you make it seem doable for this very inexperienced lady!
ReplyDeleteYvonne....I am TOTALLY an apron kind of gal. I've even looked down at the grocery store and found I was still wearing my apron, lol! Your tutorial is just perfect and I LOVE your fabric choice. I make my own aprons too with the exception of the lovely vintage ones I rescue. My first sewing project in the 7th grade was an apron :)
ReplyDeleteBlessings!
Gil
Great tutorial Yvonne! You make it look so easy and yours came out so pretty!
ReplyDeleteHappy Pink Saturday!
Is there anything you can't do?! You are so very talented and so very kind to share your knowledge with everyone. I adore your apron!
ReplyDeleteRecently when I was visiting in your area one of my friends had matching aprons made for us to wear while canning salsa. I have a new love of aprons!
Mary
Yvonne, I use aprons every day too- usually vintage, but many home made. Love that fabric!
ReplyDeletexoxo Pattie
Yvonne:
ReplyDeleteYou make it all look so simple.
I love the fabric. But I think it would have turned into a tablecloth at my house.
Looking forward to seeing you at Summer Sundays.
- The Tablescaper
HAPPY PINK SATURDAY YVONNE,
ReplyDeleteTHIS IS THE PRETTIEST APRON...I LOVE THE STYLE AND THE MATERIAL IS TO SING A SONG FOR.
I DON'T SEW...I DON'T HAVE A SEWING MACHINE BUT I AM HOPING FOR ONE AND YOUR INSTRUCTIONS ARE SO EASY TO UNDERSTAND I WOULD BE WILLING TO TRY AND MAKE THIS BEAUTIFUL APRON. IT WILL BE AWHILE BUT WHEN I MAKE IT AND I WILL....YOU WILL BE THE FIRST I SEND A PICTURE TOO.
HAVE A LOVELY WEEKEND
HUGS
SIMPLY DEBBIE
Funny you should post this as I'm planning on making my sis one for her BD and was thinking of using a vintage 50s tablecloth for the fabric. I love your pocket and trim. I was hoping to find a pattern with a hole to put your head through rather than ties at the neck, but I may just follow yours. Thanks for posting! Beautiful apron!
ReplyDeletedotsie
Gorgeous fabric and I love that you added the ric rac. Great tutorial. Beautiful apron. Hugs, Marty
ReplyDeleteI love the vintage look fabric that you chose! Thank you for sharing this wonderful tutorial!
ReplyDeleteDonna
I love this apron. Can you please explain to me what "Cure" is? I am a very beginner sewer and never heard of this. I have lots of quilt fabric left and was thinking I may try this. I am very intimidated though, but you make it look oh so easy.
ReplyDeleteYvonne, that is just adorable. I love that fabric and thanks for the tutorial. I may have to try that one since I am just starting to sew.
ReplyDeleteOh my goodness..I am an apron nut..I sooooo love them! This one is so beautiful..I love the fabric you picked.
ReplyDeleteThank you for visiting me the other day and leaving such a sweet comment...now this post is pure insipration and I need to file it somewhere in my clutter. xoxoxoxo
You make this seem so easy & it's laid out like a professional seamstress would do it. Delightful, Yvonne. Maybe I can make a baby bib, sewing by hand?
ReplyDeleteI've got the talent but no sewing machine, so kinda a problem. I'm going to take a blog break for awhile, be back week of Labor Day with my key fashion trends & what to add (for less). Love you.
What a beautifully photographed tutorial, Yvonne! I ♥ your fabric choice & your instructions are excellent.
ReplyDeleteI see I have lots of catching up to do around your blog.
Carpet cleaners have disrupted my life along with the acquisition of a new sewing table which then necessitated rearranging my entire sewing room. I've gotten a few little items completed for my DGD & will show them next week after I get photos of her in them.
Off to explore your other posts!
Have a wonderful weekend, my friend,
fondly,
Rett
I love this Yvonne! This is how I make things... I just let the sewing "move me" into the process...
ReplyDelete{don't really know how to describe that energy flow that happens... when ordinary things around the house become the essential tools of a creative project}
but you do have it!
love the print and the sweet addition of the ric-rac.
And don't our linens look marvelous on a clothes line!?!
Blessings for a wonderful weekend and Spirited Sunday!
*Maria
I will be sewing an apron soon! I love them too. Your blog is always so fun and helpful too. Will you adopt me? ha
ReplyDeleteI do have some pink aprons and a few gardening aprons and smocks but now I will try to make one.
Have a PINK day!
That is gorgeous. Looks easy enough for me to do!
ReplyDeleteBonjour Yvonne,
ReplyDeleteGreat tutorial, you make it all look so easy. I just found stack of vintage aprons at the flea market, but they're too pretty to wear. I will try to make one that I will use.
Hope al is well for you,
bon week-end,
Mimi
Yvonne,
ReplyDeleteThis fabric is simply scrumptious! What a beautiful apron!
Absolutely LOVE it! Happy Pink Saturday!!
ReplyDeleteThis is a pretty apron, and the fabric absolutely wonderful!
ReplyDeleteHappy Pink Saturday!
Hugs
Charo
Yvonne, this is just a beautiful apron. I am into aprons too as is my husband. He probably wears them more than I do, but never my homemade ones. I love making them for my granddaughters and their moms. I probably need to make some new ones as they have grown since I last made them.
ReplyDeleteI never thought of using one while in the garden. What a great idea.
I love to sew aprons too! I just bought some vintage fabric at a church garage sale last weekend (with an apron in mind!!) Love this material, great tutorial and those last two pictures of the apron hanging on the line are HAPPY! HAPPY! HAPPY!
ReplyDeleteLove Carissa
great tutorial. I think anyone can follow this. I love your apron. adorable. What machine are you sewing on?
ReplyDeleteWow, you really make it look easy. The sewing machine and I are barely on speaking terms. That fabric is beautiful.
ReplyDeleteThis apron is to die for! LOVE the fabric. You are so good at taking pics along the way...I just have not gotten into that habit yet & you are an inspiration. Thanks so much!
ReplyDeleteHave a beautiful day ~
xoxo
Pat
I love aprons cause I am such a slob! I always get teased about my aprons too. My MIL and SIL call me June Cleaver. I made a couple out of vintage tablecloths last year. I am going to have to make me some more now. Love the tutorial! I am going to show this to my 14 year old. She has a cooking class next year and a pretty apron is just what she needs!
ReplyDeleteYvonne, I love your new "company's coming" apron. The colors and pattern are so pretty.
ReplyDeleteBoth of my grandmothers always wore and apron, and you could always find something interesting in the pockets.
Happy Pink Saturday.
Beautiful fabric and a lovely apron. Thanks for the directions. I sure wish I could sew like that! Happy Belated Pink Saturday to you! Peggy x
ReplyDeleteGreat apron tutorial. You made it seem so easy. Loved it. And your final apron is too cute.
ReplyDeleteOkay! I am going to try this! I am new to sewing, but LOVE aprons! See my new post at http://threepixielane.blogspot.com/2010/07/solar-dryerthe-clothesline.html!
ReplyDeleteOne girl asked me if I made the aprons. I replied, 'no' but sent her to your site to check out this step-by-step process! Thank you so much for sharing!!
Christie at three pixie lane
Love the fabric. You make it look so simple:)
ReplyDeleteThat looks great, too bad I don't have a bib apron that I like ( I have several) to use as a pattern! Maybe I should just lose weight and I would probably look better in the aprons I have !
ReplyDeleteHow did I miss the apron, great tutorial, I am thinking about planning a girl's luncheon to end the summer what a great favor that would be tied to each chair.
ReplyDeleteLori
Loved the tutorial. Very pretty apron. I know it's not about about the pictures but I have to say they are great.
ReplyDeleteAfter I read your Spiritual Sunday post, I couldn't help but see the word apron from the corner of my eye. I have such a passion for aprons and I'm a new sewing and have been wanting to make one,or two,or even three. Thank-you so~~~~much for these directions,I will be on the hunt for some fabric after Christmas.
ReplyDeleteGod Bless,
Ginger
I think you ment 8"x12" for the pocket not 18x22 ;)
ReplyDeleteMy grandmother was a trimmer for a fashion house in LA and wore cobbler aprons with a large front pocket. A
ReplyDeleteSome of the first aprons I made were for her and when we wanted to get her a gift she always asked for a new one.
Love this post! Your blog is amazing and it inspires me so much! Thank you for taking your time to create such lovely posts - they are appreciated very much!
ReplyDelete